
Box Lacrosse: Special Teams
“Special Teams” are a group of players designated to perform certain duties during certain situations in the game. Power-play and short-handed are two of the most notable “special teams” used during the game due to their frequency, but other special teams include: “Face-Off/Loose Ball Team,” “Last Minute Defense/Offense" units, and the Ball Back/Rag Teams.
Most special teams have two units, otherwise it usually depends on how tired one group is versus the other, or the situation, with the first unit being the most relied upon. If the 2nd unit is playing better than the 1st unit during a game, or over a stretch of games, it should be considered whether to make them “starters,” or to change the line-up entirely.
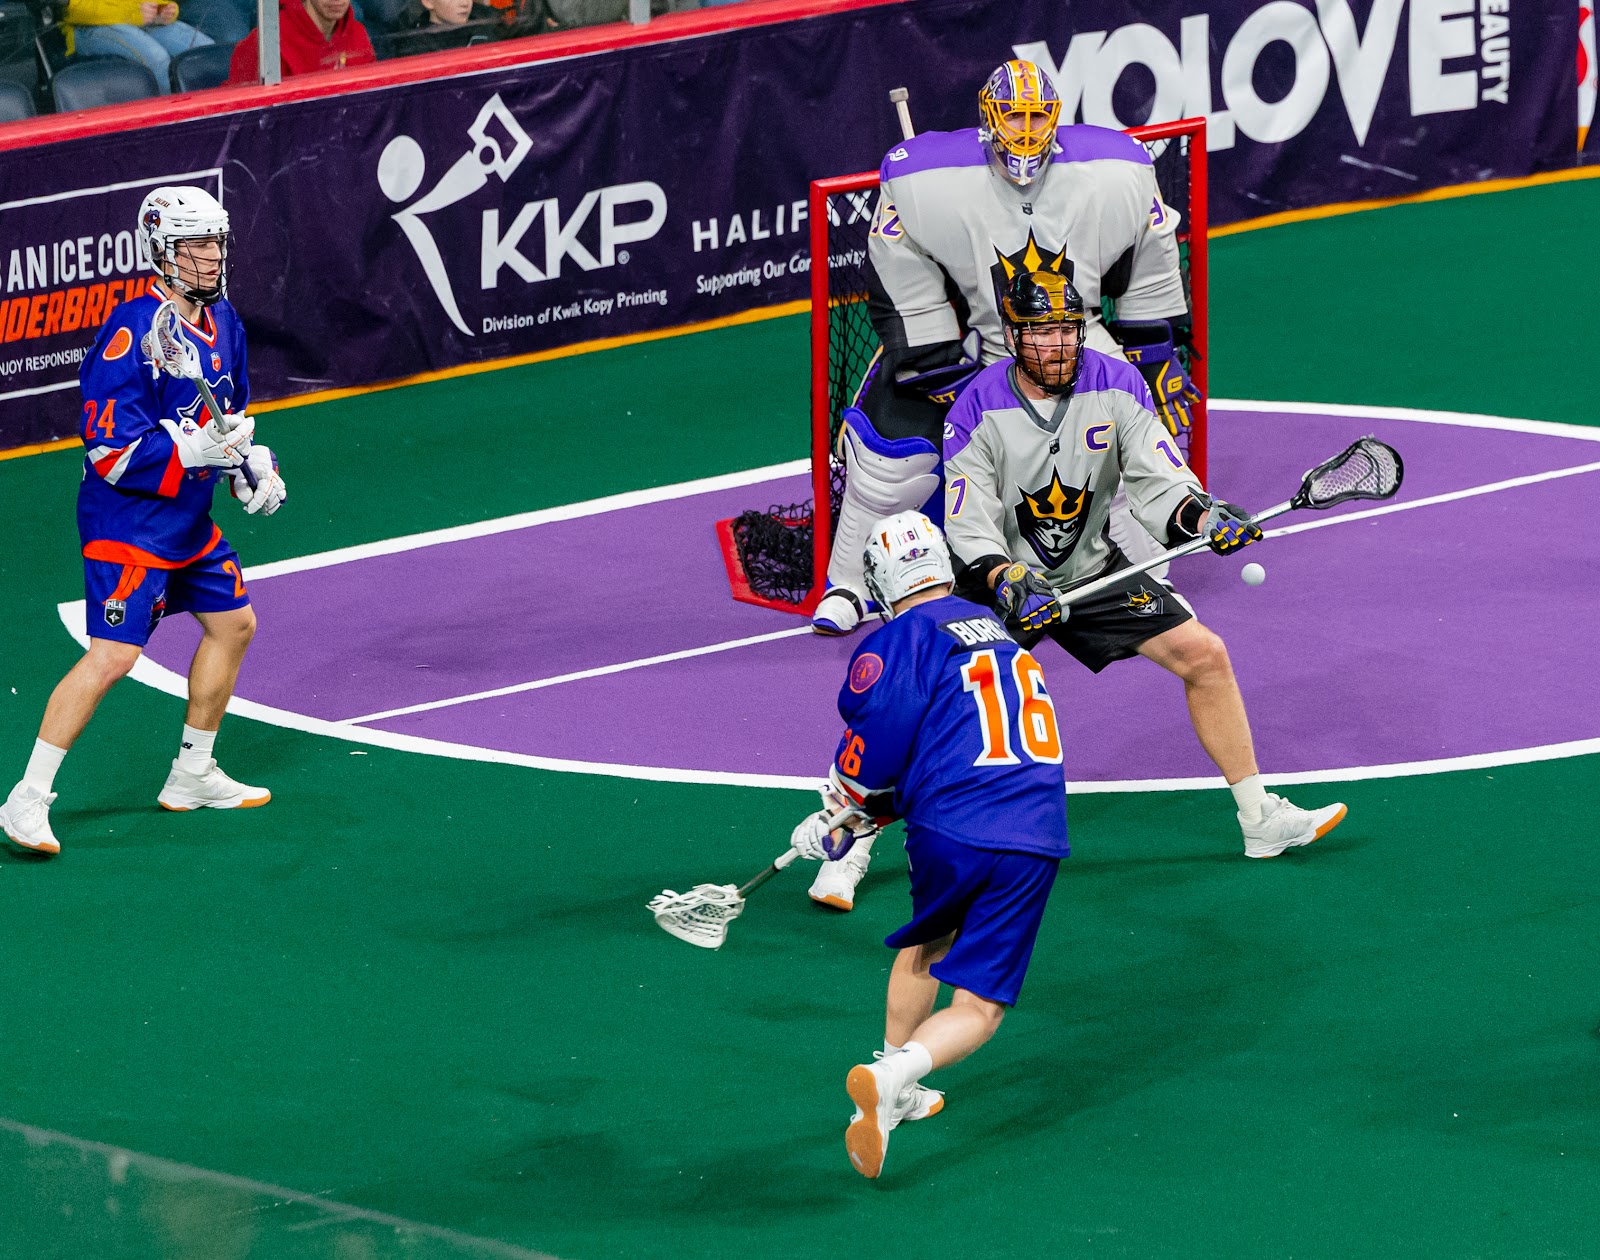
All positions on the different special team therefore have a starter and back-up. Sometimes players that are playing exceptionally well during the game might also be added to a unit late in a game, while players having a bad night might be removed. All players should know exactly where they are on the line-up sheet prior to a game or practice, and are held accountable if their unit is called and they aren’t on the floor. If players who are called to be on the floor are too tired to go out, they should let the coach (and backup) know as soon as possible, ideally before or after the unit is called.
A “powerplay” is a numerical advantage on the floor as a result of a player on either team taking a penalty. A power-play is the result of 2-minute minor and/or 5-minute major penalties, taken by one team or the other. During a “5-on-4,” teams will usually set-up in a 2-2-1 formation (standard offensive positions), but a 2-1-2 ("dice") formation is also used, and sometimes a player behind the net (1-2-2). There is generally less interchange between positions during a power-play, with players instead having assigned roles in set-positions.
When a 4-on-3 situation arises, offensive players generally set-up in a square formation (offensive version of the "box"), occupying the two shooter and crease positions. A 5-on-3 power-play traditionally still sets up in a "box" offensive formation (4-on-3), with the 5th player standing near centre-floor acting as a "rover" on any loose balls, or opportunities the defense may have to breakout. Double-teaming the ball after losing it ensures the deadly 4-on-3 time gets maximized. A 5-on-4 power-play should strive to score 50%; whereas a 4-on-3 power-play is expected to score 75% of the time; both percentages can be skewed by actual power-play lengths (see coincidental penalties).
Powerplay Execution: Click Here For Video
Usually before any set-play or shot is initiated, a team’s most skilled players will begin by first passing the ball once “around the horn,” unless trying to catch the other team off guard ("quick hitter"). Early diagonal passes are usually avoided, as well as early shots with relatively little or no ball motion and/or "ball movement," which are essential in creating quality shots. When less than 10 seconds are left in a penalty, no shots are usually taken until just before the penalized player returns to the play; for fear of a turnover resulting in a breakaway (unless this player is an egg & spooner or the team is down a few goals late in the game).

Aside from these general team rules, teams will either freelance or execute a set-play within each power-play possession (re-set), with the goal of getting an open shot in the prime scoring area. Freelancing doesn’t mean to stand and shoot whenever a player feels like it. Ball movement should be quick and players should still be moving, cutting when the ball is low at the crease position, dragging, and always filling. As a general rule, the opposite-side (off-ball) shooter should cut the middle every time the ball-side crease player gets the ball (with all players "filling" accordingly); the strong-side shooter should seal their check whenever the point player starts dragging towards them (both are considered automatic triggers).
Most set-plays on the power-play involve some sort of overload, via a pick/seal or multiple picks/seals, combined with some sort of ball/player movement; all at specific times (established during practice).
Below are a few basic set-plays that can be used at any level of lacrosse, within a standard 2-2-1 Formation:
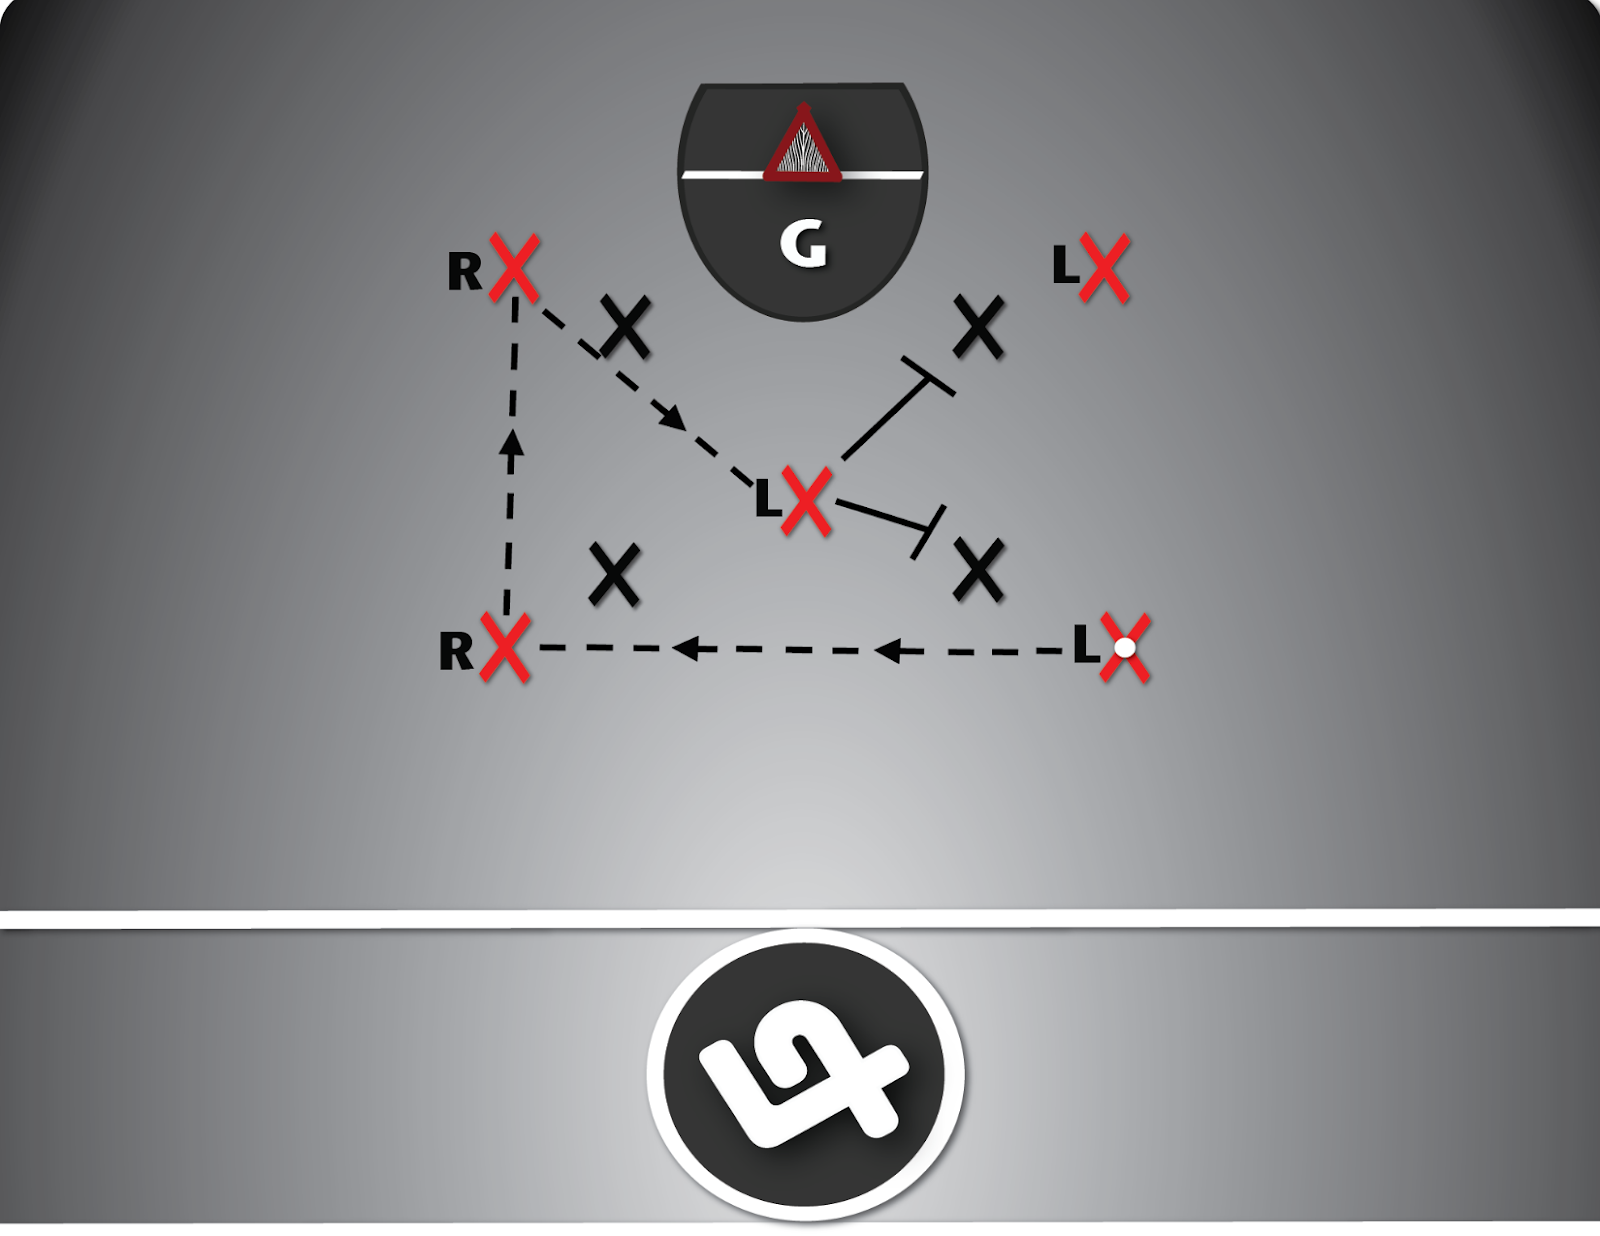
Set Play #1: “Drag & Seal” - Click Here For Video

Set Play #2: “Pick The Shooter” (Roll Option) - Click Here For Video

Following a shot, players need to be ready to react immediately (this should always be re-enforced during practice - offensive players must also be taught how to double-team properly). Defensive coverage against reverse transition is the first responsibility, but more often than not there is an opportunity to Ride and double-team. Teams should do their best to apply pressure once general coverage has been established, in order to create a 10 second call or a turnover. If they are tired or unsuccessful, the back-up (Power Play #2) unit usually then gets the next opportunity on offense.
“Dice” Formation:
When playing the "dice" formation (2-1-2), set-plays and freelance may also be used; usually with a team's best picker/finisher in the middle. The added advantage of this formation is in causing miscommunication amongst defenders as to who is responsible to cover the middle player, and in what situations (requires high lacrosse IQ on the defenders' behalf). During freelance, the middle player can pick anywhere and also try to find soft spots for quick catch and shoot scenarios; primarily staying on their proper floor side. All other players should utilize the picks being set for them (otherwise presenting a decoy), while being careful not to force passes into the middle player (60-40 passes only).
Short-Handed: - Click Here For Video
Being “short-handed” or on the “penalty kill” is a numerical disadvantage created by one or more players taking a penalty. Teams will usually set-up in a "box" or "diamond" zone defense while short-handed with 4 defenders, or a "triangle" with 3 defenders; with different "rotations" available for each, if desired.

The box is structured to defend both crease offenders and both shooters, with the two high defenders' also splitting the point player (or the player in the middle if the powerplay is in a 2-1-2). Should the point player attempt to shoot, both defenders should “pinch” tight together, trying to block the shot.

When one of the shooters cuts through the middle, it is also the off-ball “high” defenders’ responsibility to follow the "cutter," eventually “passing them off” to the on-ball low defender. The “low” defenders’ major responsibility is to lock-off the creases, with all defenders keeping their sticks and bodies in the shooting and passing lanes.
Generally, the “high” defenders’ sticks are towards the middle, and the low defenders’ sticks are towards the boards, in order to best defend these lanes. Although, if either "shooter" on the power-play is a significant playmaker, it may warrant the high defenders' stick being on the outside (board-side).
The diamond is structured to directly cover the point and both shooter positions, with one defender splitting both crease players down low, playing “cat & mouse.”

This defense is designed to invite shots from the crease players and take away the shots of the offenders up high. Defenders must be careful not to get over-extended, leaving too much space in the middle.
The goalie usually plays back closer to the goal-line (“deep” in the net) to eliminate the angles for quick stick opportunities at the crease. The two defenders at the side of the diamond should also have their sticks toward the middle, in order to better defend the passing lanes to the crease players.
The triangle is used to kill a 4-on-3 powerplay. It can be played with two defenders high and one defender low (2 up, 1 back), vice-versa, or a mixture of both (Inverted Triangle). Playing two defenders up high invites the crease players to shoot and vice-versa (1 up, 2 back) invites the shooters to shoot.
In the latter case, the “low” defenders need to lock off the “crease players,” allowing the goalies to come out and challenge the shooters. With two defenders high, the low defender must be able to deter quick sticks from one crease player to the other (“crease-to-crease”), while also playing “cat & mouse” and communicating with the goalie.

Short-Handed Execution:
It is important that all players know the situation and which zone defense is to be played, prior to getting on the floor; also any “assignments,” if required. If the other team is consistently successful against a certain zone (i.e. box vs. diamond), it is also important that coaches are ready to make adjustments. Teams may further switch up the zone being played simply to disrupt the other team’s offensive flow.
Players should always have their sticks up with their bodies in the shooting lanes, also aware of what is happening off-ball (head on a swivel). Defensive players need to recognize picks/seals, drags, cutters, fillers and players behind the net; communicating amongst one another. As a general team rule, players should not move more than “three shuffle steps” at a time, depending on the zone being played and the ball movement of the opposing team. If one player slides out of desperation, every player should slide in that same direction ("go"), effectively changing which part of the zone they are defending.
The Goaltender is essentially the biggest difference maker while short-handed, as they are the cornerstone of any defense. Loose balls are amply important, with the goaltender playing the most significant role via rebound control. Defenders also have a huge responsibility in this aspect as well, being sure to box-out after all shots (especially the low defenders). Instead of battling for rebounds in front of the net, it is usually better to just take a minor interference call, rather than allow the opposing team to pick-up a loose ball and potentially score.
Defenders need to make split-second decisions as to whether or not to pursue loose balls, some of which could potentially leave them out of position if they don’t get there first (50-50 balls). If a teammate does happen to obtain possession of the ball, defenders should run the ball up the floor “in two’s,” with all others running hard to the bench for a line change (a full change would be ideal; thus sparing the energy of the premiere penalty killers).
Concluding Thoughts:
Games are very often won and lost on special teams. It is one of the 4 major aspects of lacrosse which all teams strive to win in terms of differentials, when compared to the opponent. The other 3 aspects are transition goal differential, 5-on-5 goals for and against, and lastly loose ball totals.
Staying out of the penalty box is the easiest way to win the special teams battle. It takes special attention every practice to make sure your triggers, timing and positioning are flawless within your special teams. If they are, your team will never be out of a lacrosse game.
In the end, back-ups are just as important as the starters, as you never know who will be injured, tired, in the penalty box, alongside a host of other variables and scenarios that your special teams may be faced with.
Beginner Lacrosse Drills: Goaltending
Introduction:
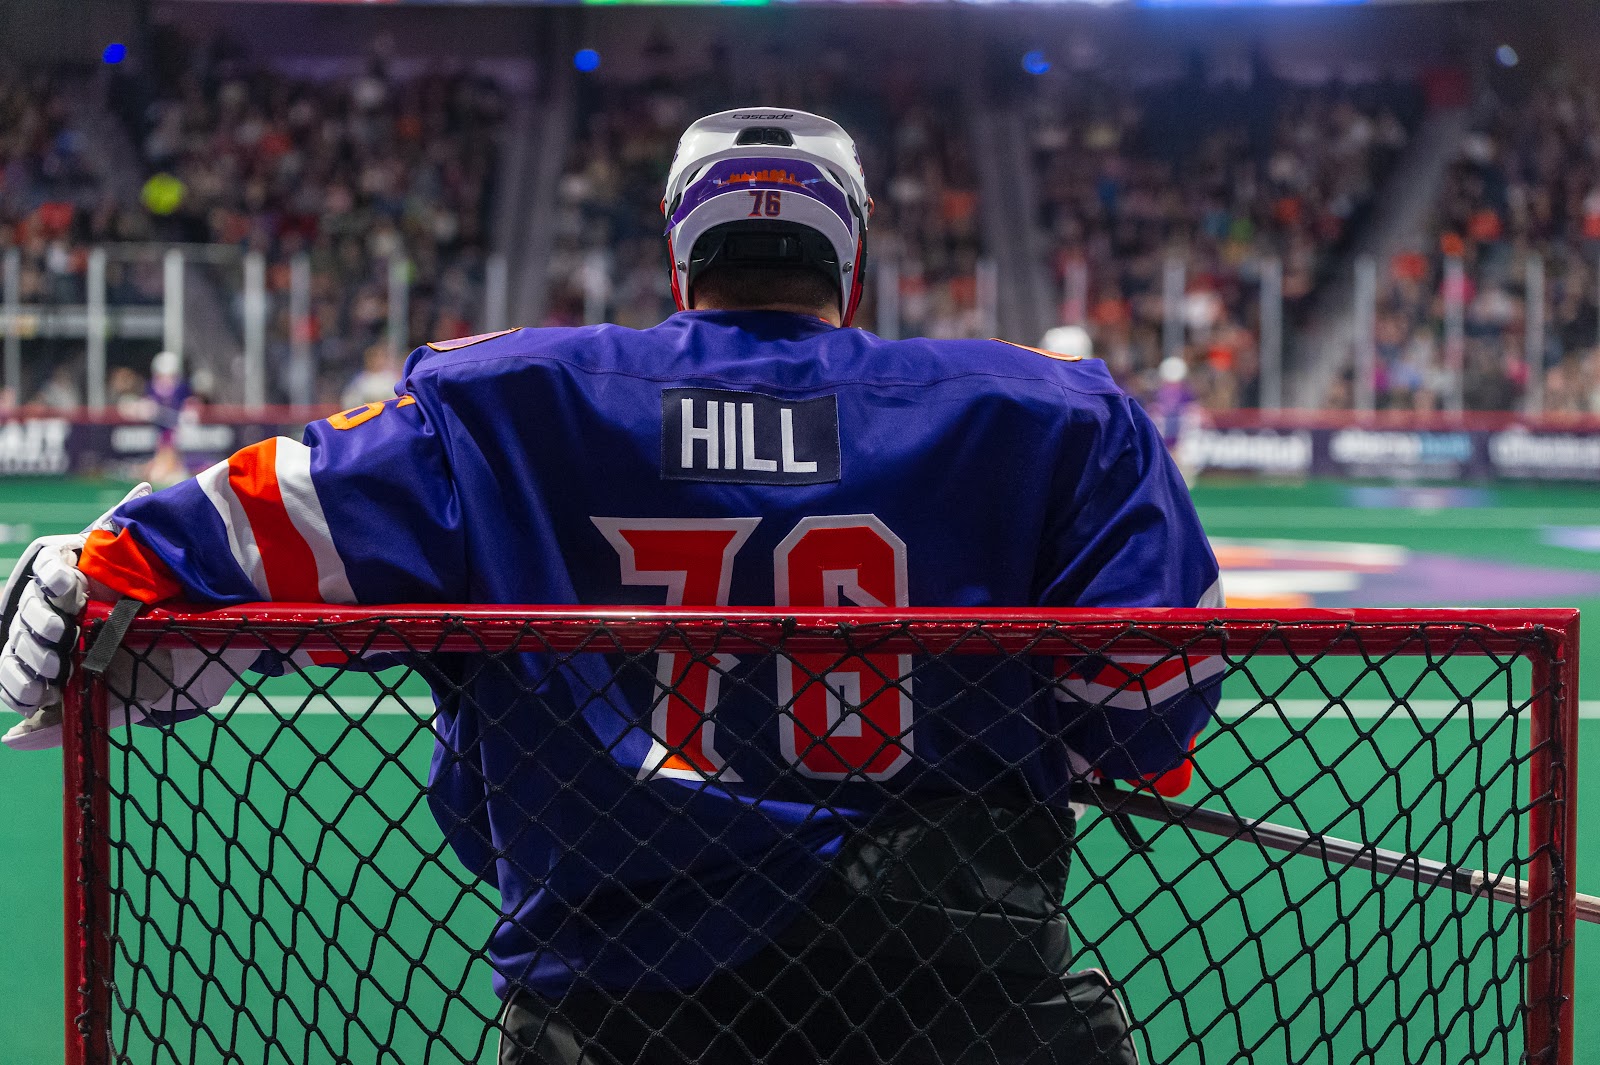
Goaltending is a crucial element to any lacrosse team and is by far and away the most unique position in lacrosse. Goaltenders are the last line of defence and depending on the outcome of the game, can be hailed as heroes or scapegoats. As such, It is important for a coach to understand, teach and reinforce the fundamentals of goaltending and incorporate them into drills in practice, at all times. Solid goaltending incorporates a certain mixture of fearlessness, sound technique and athleticism, to help prevent opposing teams from scoring. The goaltender does not necessarily have to be the fastest athlete, but what they lack in speed they must make up for in terms of body control and game awareness.

With this in mind we will introduce some key fundamental concepts related to developing a goaltender, while also reviewing the Goaltending Save Cycle – the process a goaltender goes through when protecting the net. This cycle includes tracking the ball, getting into position, maintaining a proper stance & good angles, selecting the appropriate save technique and controlling the rebound. In this blog we will give you 3 complimentary drills for each of the fundamentals, which we feel offer a quick and efficient means to improving your goaltending skills.
Tracking the Ball:

The number one priority of a goaltender is to always track the ball when it enters the defensive zone. As with “finishing a check” for a player, finishing the play if you’re a goalie means to track the ball until it is in your pads, otherwise “tracking rebounds” and always repositioning to the proper angle (all of which are the most important habits related to the position of a goaltender). As a player gets "in tight" with the ball, the goalie should be staring at the player’s stick, magnifying their focus and reading the body language of the shooter. The odd time teams will attempt to challenge a goalie’s mental focus in this regard when they perform a “hidden ball trick.”
Movement:

In order for goalies to be sure that they have the proper “angle” of the ball carrier covered they must know exactly where to stand, constantly repositioning, getting “ready” and “square” depending on where the ball is located. It can take upwards of 20 seconds for an opposing teams’ offense to generate a quality shot, and with only 30-40 shots per game on average this means goalies spend the majority of the time “repositioning” without actually making a save.
The Goalie Triangle
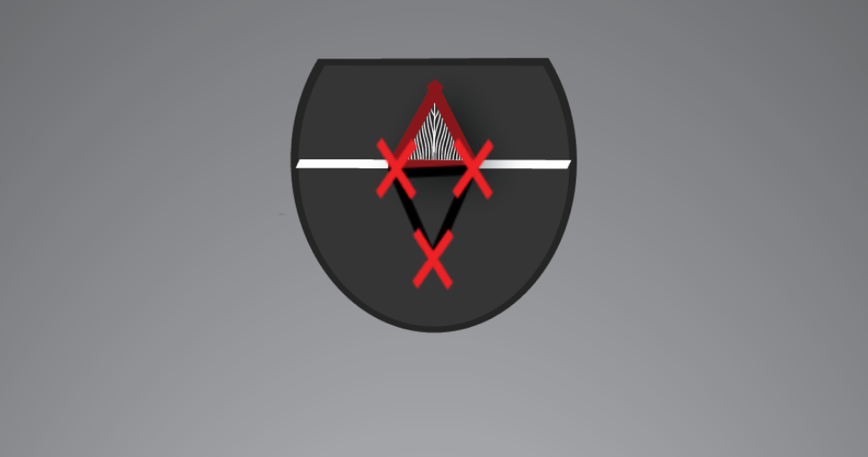
With offensive ball movement, goalies need to effectively move through their “goalie triangle” as the ball moves through the standard offensive positions, also adjusting to the corresponding release point of a potential threat. Occasionally, acrobatic saves are necessary to defend against quick ball movement, so goalies need to be able to recover quickly to the ready position, while still keeping their eye (tracking) on the ball and playing the angle. With rebounds and quick passing, goalies need to be able to reposition quickly and efficiently, in order to be successful.
Positioning:
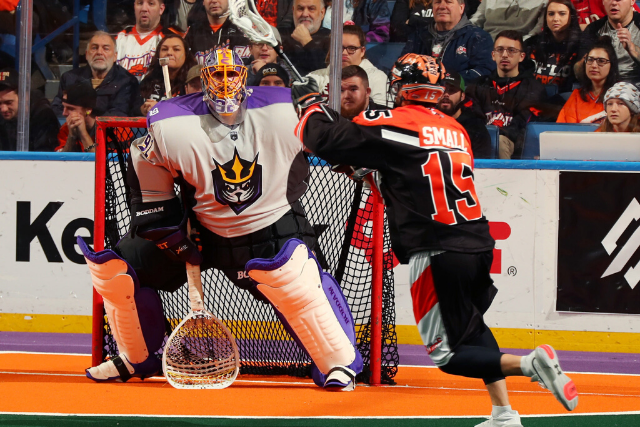
A goalie’s ready stance is very individualized to the goaltender and will evolve as a goalie develops with regards to stick position, off-hand location and other intricacies of the position. In general, a goalie should be standing in the “athletic position” with feet hip width apart (on the balls of their feet, with feet pointed slightly outward), the goalie’s upper body should be upright with a slight forward bend and lower body should have knees slightly bent; the large majority of the time. Goalies should strive to stay on their feet (for maximum net coverage) while keeping their eyes on the ball and repositioning to square up (align) with potential threats, as best as possible.
The goalie should hold their stick in their dominant hand, holding the shaft firm, halfway down the goalie’s thigh, tight to their body and they should be leaning on the stick slightly (positioned 3 to 6 inches in front of one’s feet); "dragging the stick" whenever moving. The “shaft” of the stick should pass between one’s elbow and body, with the arm-pit becoming a lever in aiding with the movement of the stick; the rest of the shaft comes out behind the goalie’s shoulder. The glove hand should then be placed beside the hip with one’s elbow slightly bent creating an "arm triangle" that covers up the “six-hole,” otherwise used to reach to save low perimeter shots.
Save Selection:

It is important for goaltenders to work on and use proper save selection. Proper save selection is important for goaltenders to work on and understand. The location of the shot determines the appropriate save technique a goalie should use. Many times, goaltenders tend to rely on one save technique for all shots (i.e. going down in a butterfly position on low shots). Using incorrect save selection will limit net coverage, rebound control and second-chance save ability. Using an inappropriate save technique based on the shot situation will limit net coverage and affect rebound control, as well as the goalie’s ability to make second-chance saves. Lastly, it’s important for goalies to exercise patience and track the ball with their eyes to increase their chances of making the correct save selection.
Fundamental Save Techniques:
Kick (Leg) Saves: When a goalie is standing big in the ready position and thinks a shooter is going to shoot to the low corners of the net, he/she can kick their foot out as a basic manoeuvre, making sure to also keep their stick “between their legs” (low to the ground). While making this manoeuvre the goalie’s foot should not be raised off of the ground and it should be kicked out and towards the ball. The other option on a low shot would be to drop into a butterfly/half-butterfly, although a stand-up style is generally preferred.
Glove (Arm) Saves: The “glove hand” is the hand of the goalie that is not holding the goalie stick, used to orient goalies in the net (see feeling for posts) and to help stop the ball from going in the net. The back of the goalie’s hand should always face the ball; goalies should never attempt to catch the ball with their bare hand, which could result in significant injury. Glove hand location is a personal preference, depending on the situation, something that beginner goalies will become more aware of as they develop. Goalies must learn to be active with this hand, keeping it loose and “ready” to react in anticipation of perimeter shots towards the “low corner” on the “glove-side.” The other option is to position this arm against their waist, forming an “arm triangle” (upper arm -> elbow -> lower arm).
Stick Saves/Stick Swipe: The stick hand is the hand that holds the goalie stick. Goalies must learn to be active with this hand, keeping it loose and “ready” to react in anticipation to shots coming from both inside and out, left and right. The majority of “stick saves,” however, come from goalie’s not moving their stick at all, keeping it low to the ground and in between one’s legs (five-hole) at all times (habits). Whether stepping (moving laterally) to the “stick-side” or “glove-side,” depending on the direction of the shot, the stick/leg/body should move together (as a unit). Another stick manoeuvre when the goalie feels a rebound bouncing at their feet is the behind-the-back sweep, or "swipe," whereby the goalie takes a step forward and swipes their stick behind their back with one hand, sweeping any stray balls away from the goal-line.
Shoulder Blocks (Left & Right)/Fake Shoulder Blocks: When a goalie thinks that they have the angle covered, perhaps tipped off by their teammates defensive positioning (i.e. defensive player forces the player to their wrong side), they can use a variety of explosive lateral (east-west) movements, such as “shoulder blocks,” to ensure that there is no net for the opponent to shoot at. Done quickly and decisively when players “telegraph” their shots, goalies should step laterally, keeping their stick between their legs and in one smooth motion exploding their lead shoulder out to the side (relaxed shoulders -> scapular set), covering the “top corners” of the net (see goalie “ready” position). Goalies can also entice players to shoot far-side or short side by “faking a shoulder block” to one side of the net and then exploding in the opposite direction at the last second, depending on the reaction of the shooter (give & take). Whatever way they might be "leaning" toward, goalies should be sure to move their entire body and commit to their final movement. Be wary of beginner goalies being tempted to jump on high shots, which should be discouraged by the coach.
Butterfly/Half Butterfly: A “butterfly” save is when a goalie drops to both knees in anticipation of a shot to the lower half of the net (often on underhand shots), keeping their “shoulders-set” (upright posture) and flaring their legs out to the side. A “half-butterfly” is a large side “lunge” step, either towards the “short-side” or “far-side” of the net, where the goalie will slide onto their lead leg while keeping their shoulders up to cover the top of the net. Goalies should beware that the half-butterfly may open up the five-hole for a brief moment, so it should be used sparingly. Goalies need to be able to recover quickly if they commit to a half-butterfly, which can be risky if the offense is able to quick stick the ball from side-to-side.
Rebound Control:
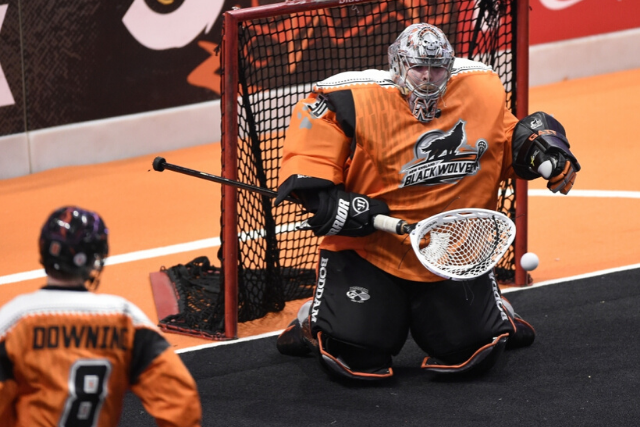
Rebounds and “rebound control” are a big part of a goalie’s job. Goalies should “battle” just as hard as anyone else around the crease and be aggressive (especially while short-handed) in order to obtain any sort of loose ball. Any loose balls around the crease should be scooped with 2 hands or picked up with the goalies’ hand. For loose balls outside of the crease, the goalie must be sure to have at least one foot in the crease while scooping, in order to avoid a "back in" call against.
Quality goaltender equipment and a goalie’s ability to cushion (corral) the ball after it hits their body or stick (similar to a player having “soft hands”), goes a long way in terms of rebound control. With a shot that hits the goalie’s stick, the goalie should twist the stick slightly in the opposite direction of where it hits the stick in order to avoid the stick “spinning," also in an attempt to corral the rebound. The action of “cupping” is the preferred method of controlling a high shot that is undoubtedly about to hit one’s “chest protector,” whereby a goalie drops their arms forward and absorbs the ball as it hits the chest protector, creating a sort of concave that effectively keeps the ball close by (instead of ricocheting into the corner or out of bounds).
When a rebound cannot be controlled, the next course of action is for the goalie to immediately "track the ball" and reposition. “Communication” with defenders is also a big part of this responsibility, and to the goaltender position as a whole.
Reacting To The Ball:
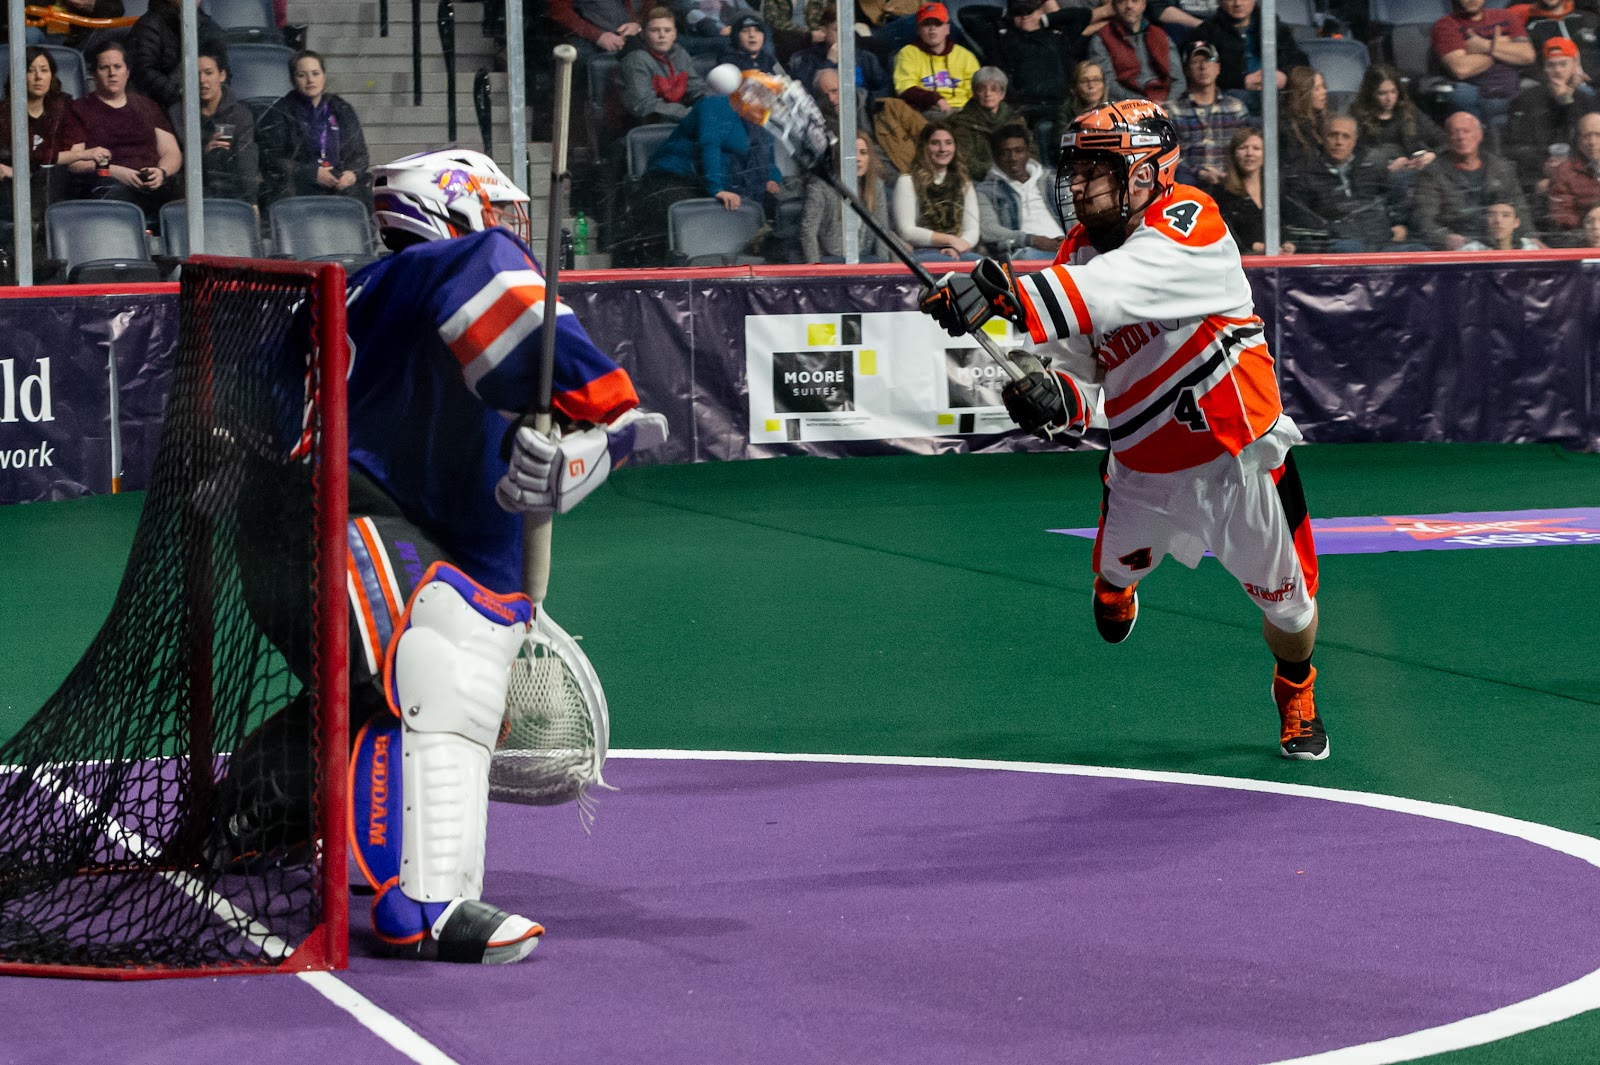
Lastly, it is important to mention that as the last line of defence, goalies should be “ready” to react at all times, especially when the ball enters the defensive zone. Shots from the opposing team can come from anyone at any time, thus a goaltender should always be prepared in a ready stance to react quickly to the action in front of them. In order to consider all of these different factors in a matter of seconds, a goalie’s mental focus must be one of their best qualities (“always alert”), alongside having a thorough understanding of how lacrosse is played and the personnel being defended against.
Drill #1: Warmup Shooting

Warm up shooting drills are a great way to help a goaltender develop their tracking skills, while also working on their positioning and save selection. These drills should be done during the beginning of practice, which allows the goalie to prepare mentally while also training their eyes to track the ball; especially for new goaltenders, getting comfortable with having a hard lacrosse ball thrown at them. The goalies focus should be on watching the ball as it leaves the players stick and training their eyes to follow the ball all the way up until it hits and see where the rebound goes after making a save.
Have the coach start off shooting to specific corners of the net indicating to the goaltender which corner they will be shooting at (5-10 shots per corner) prior to starting the drill and when switching between chosen corners. This takes the guessing out of where the shot will go and allows the goaltender to choose the appropriate save based off the location of the shot; tracking the shot out of the coaches stick.
As the goaltender becomes more comfortable the coach can then begin to shoot from different angles around the perimeter, switching to inside shots after shooting a few shots from each of the 5 different angles.
You can also increase the difficulty of the drill by instructing the goalie to trap and scoop any rebounds close by the front of the crease. This forces the goaltender to not only track the ball as a shot is coming towards them but also to follow the ball after making a save and either corralling the rebound or repositioning themselves for another shot. Missing the net on purpose every now and then, hitting the ball off the glass, or rolling the ball somewhere near the crease, are also effective teaching techniques. Have the goalie reach for loose balls outside of the crease (in front of and/or behind the net), being sure to keep at least one foot in the crease while trying to obtain the ball.
To further increase the difficulty, add a second shooter to the drill and pass the ball east-west prior to shooting on the goalie. In this variation coaches can switch up their release points to allow the goalie to track the ball leaving the players stick from different angles, while first having to reposition off of swing pass from the other coach.
Drill #2: Goalie Numbers Drill

Goalies can be faced with movement between several of these positions in a variety of sequences, during any given situation. Central ball position is the most threatening, with inside shots being relatively more threatening overall as compared to perimeter shots. A great way to work on footwork and movement around the crease is have the goaltender move through the 5 standard angles. Have between 1 and 5 players or coaches (often just 1-2 coaches) standing at one or more of the standard offensive positions.
If less than 5 players/coaches are in the drill, a coach or player may call out the number (see drill diagram) of the position where the player is missing, and the goalie must re-position ("square up") to that number as if there was an imaginary player there.
Instruct the goalie to move through the 5 standard angles, repositioning back to the goal line and feeling for their posts in between each angle. The coach calls out a variety of numbers and the goalie repositions to those numbers, or otherwise follows the ball (if multiple players/coaches), ultimately finishing with an adjacent shot (1-2 & 5-4) or finishing at the crease (2-1 & 4-5). Start off slowly and advance the drill to move as quickly as possible as the goaltender becomes more comfortable. Have the goalie move from left to right, right to left, or alternate from side to side.
Drill #3: Quick Reaction Rebounds

Begin with a line of left-handed and a line of right-handed players on their proper floor sides, at the shooter positions.
The goalie starts facing the coach (or player), who will be sending in the first pass to either the same-side or opposite side shooter (pre-determined), whose turn it is. The goalie must reposition to challenge the shooter, who takes an outside shot.
After the shot, the shooter continues toward the net as if attacking the rebound on the same-side. This player then receives a pass (or loose ball) from the other coach (or player), who is standing at the crease position or behind the net, feeding them on the door-step. Players can also become passers after they shoot, before rejoining their original line (depending on the calibre of players).
This drill alternates from side-to-side in orientation, with the next player not taking their turn until the player in front of them is out of the drill.
You can also start with balls in one shooter line or the other (switching halfway through the drill). The players run toward the net and can make as many passes as they want, with one player eventually shooting.
Whoever doesn't shoot, the coach (or player) on the same-side or opposite to them (pre-determined) feeds them a pass for another shot on the door-step. Coaches should mix it up sometimes, and throw a second pass to the original shooter, in order to keep the goalies honest.
Concluding Thoughts:
Goaltending is a special and unique position that requires specific attention and focus by coaches to help hone and develop a goaltenders’ skills and abilities. Don’t just fire balls at a goaltender at practice and hope that their skills will improve over time. Instead set aside specific time to work with your goaltender(s) during practice and incorporate goaltending skill development into regular drills using the Goaltending Save Cycle as a guide to building the foundations of solid goaltending.
This blog was written in partnership with former New Brunswick Mavericks Head Coach & General Manager, Evan Richtsfeld. For further information and more goaltending related drills subscribe to laxlife.ca and take a look at the goaltending section of the website; otherwise keep an eye on this blog for more goaltending information in the future...
Beginner Lacrosse Drills: Motion Offense
Upon transitioning the ball from defense to offense teams will get into the phase of the game known as their set-offense, otherwise known as their offensive system. For beginners (8-16 year olds), this is a very simple set of goals/objectives on offense (different for each age group), usually taught within the framework of the “motion offense,” which is the most basic offensive system and ultimately the focus of this blog.
A team’s set-offense should not start until all 5 players are generally in their set positions, which for our purposes are the 5 standard offensive positions. This is a big problem at the grassroots level where often two players have not even entered the offensive zone and individual players are going one-on-one against 5 defenders, trying to set up “their shot.” The concept of “team offense” refers to working together as a group, in unison.

The first look in any offensive system is fundamentally the give-and-go. The ball gets passed to a certain area of the floor and then you move (“cut”), and if in that process you are “wide open,” the ball should in theory be passed back to you. Heck, if somebody is wide open at any point you should be giving them the ball, which is an offensive fundamental that has to do with players having their head up and seeing the floor whenever they are in the offensive zone.
The “motion offense” is a system that relies on getting the ball low (to the “crease position”) and then sending a series of cutters in a particular order (timing), with the ball carrier carrying the ball high and shooting, if no options present themselves.
The principles of the motion offense in box lacrosse & how to teach it most effectively has been a difficult task that has taken years to organize, amidst much of the scattered misinformation that surrounds it, never seeming to be fully or adequately explained.
Here is my best attempt…
Drill #1 - Motion Offense (Walk Through)
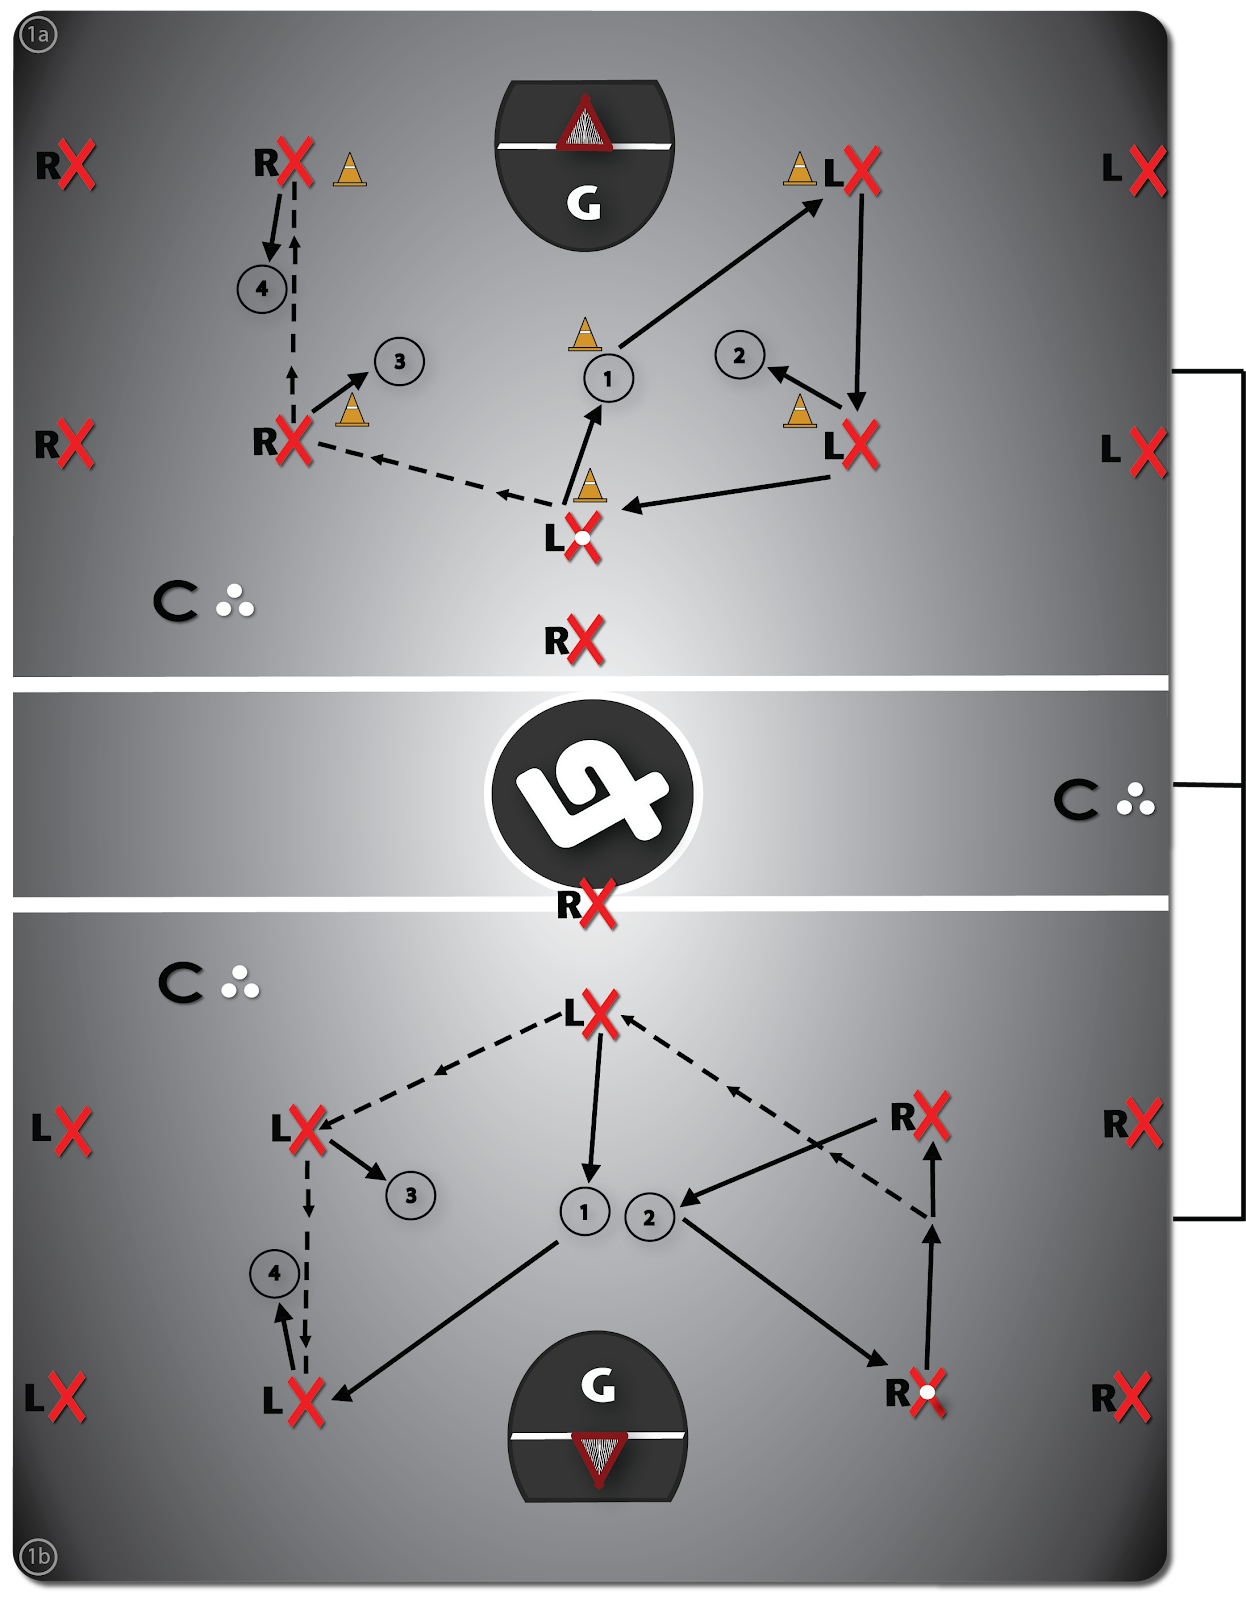
The most basic motion (Look #1) happens after the point player (strong-side) passes to either shooter and then cuts the middle, eventually filling into the strong-side crease position (perhaps running around the net first). If this player is wide open they could in theory receive a “give-and-go,” but that is rarely the case.
Next, the crease player should pop-out and the ball should then be passed low (deep), triggering Motion/Look #2 which is an off-ball "cut" from the far-side shooter position; this is the first read/look for the new ball carrier. After the off-ball shooter cuts they will either receive a pass, or if not fill into the crease position on the far-side, with the crease player filling up into the shooter position on that side of the floor.
If no pass is made, Motion/Look #3 is the next decision for the ball carrier to read, which is a cutter from the player at ball-side (same-side) shooter position, who looks for a give-and-go return pass; otherwise to seal the shooter position, or down-pick the crease position (these are the “age dependant” variables).
If none of those "looks" are open for the ball carrier they should fill/cycle up into the shooter position and take a shot (if it's there) or swing the ball to the far-side shooter/point (Motion/Look #4), repeating the process (if advanced); otherwise being free to go one-on-one. Throughout this process it is the ball carrier’s responsibility to have their head up, always being a threat.
Drill #2 - Point To Shooter (Give & Go)

I like to do my first walk through, and teach the principles of the motion offense, by “triggering” it with a pass from the point player to the weak-side shooter. A pass to the strong-side is a harder give-and-go return pass to catch (cross body), yet both are practiced in this first drill, with players encouraged to switch who they pass to each time through the line at point. Both of these passes (weak-side & strong-side) are also important in subsequent drills, and this is great practice for beginners in popping out to receive the pass, while also working on soft hands and disguising their passes.
Drill #3 - Off-Ball Cutter
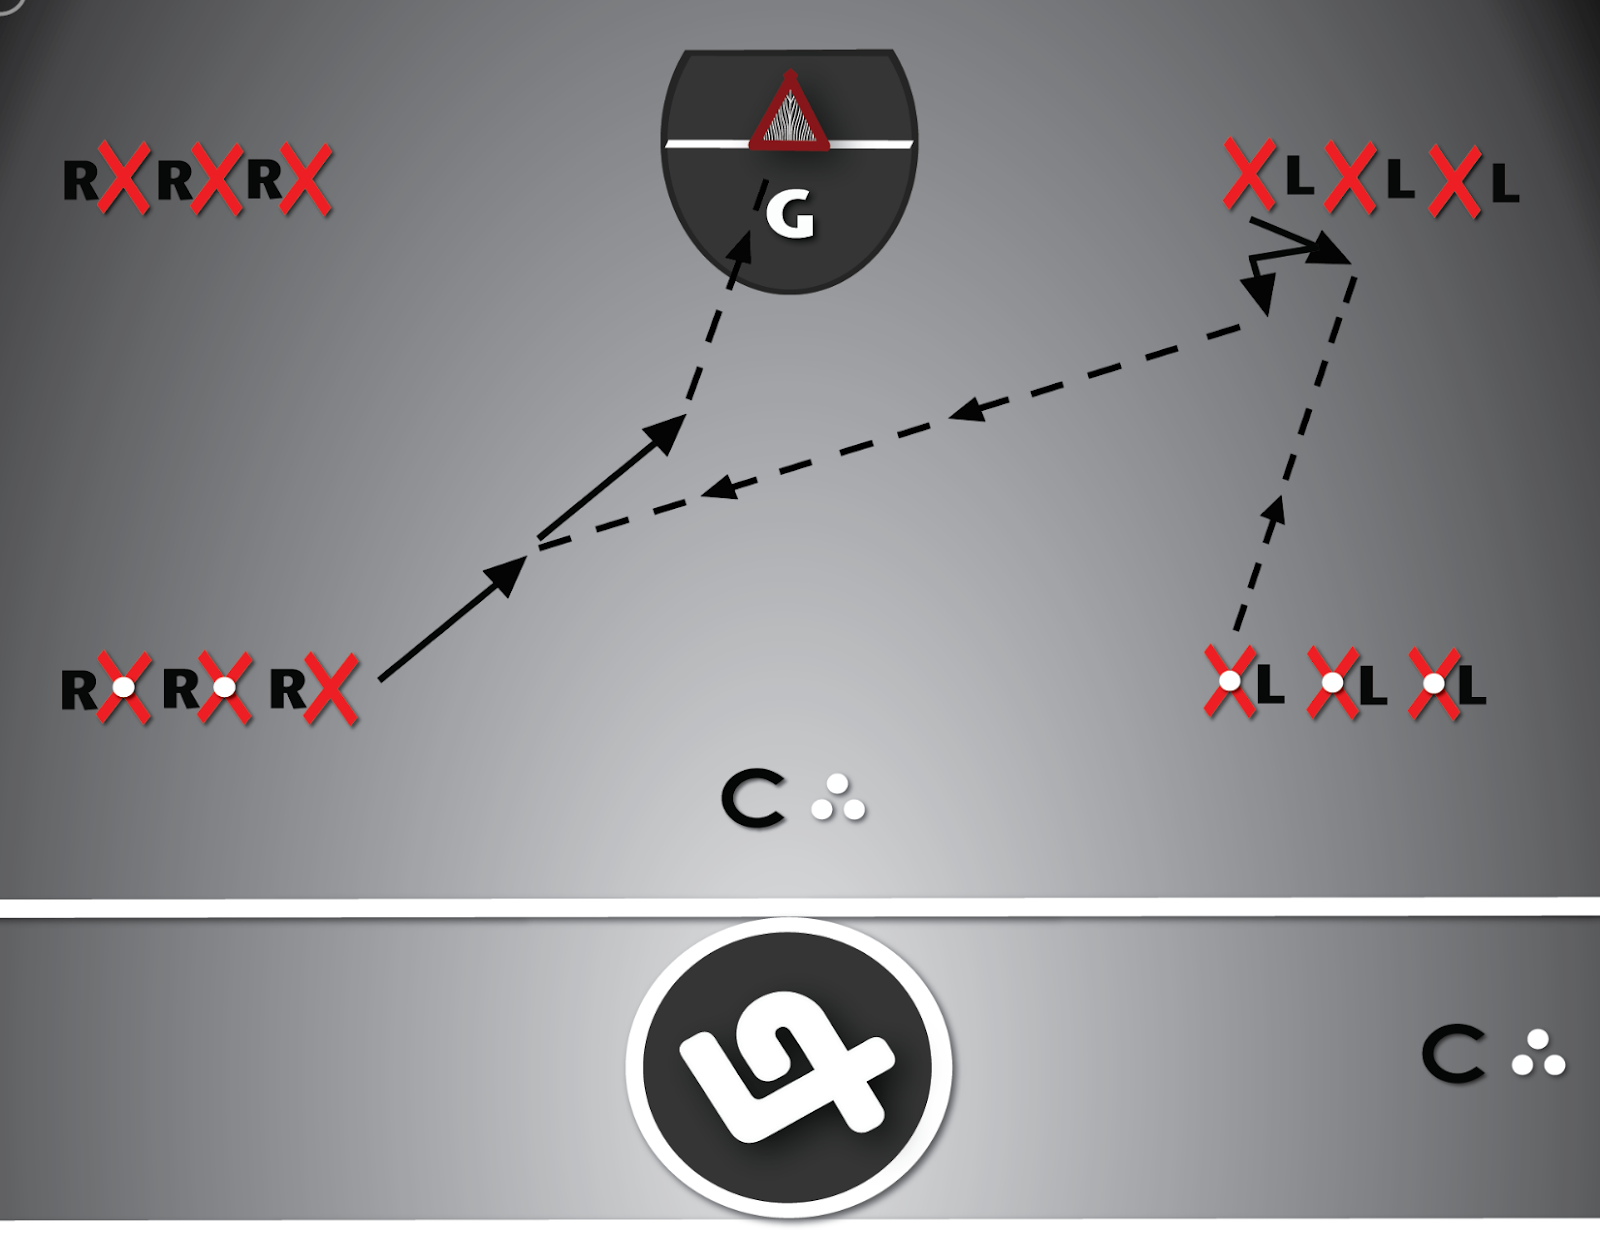
The first legitimate threat in the motion offense happens after the ball gets passed (or run) low, to the crease position; at which point the off-ball shooter needs to cut through the middle. It’s important to reiterate that the ball doesn’t necessarily have to be passed low in a game/practice, as once the defense catches on they may start locking off this pass. It is also important to note that the off-ball cutter usually takes some sort of physical beating while cutting, and a good defender won’t just let you do whatever you want. In this drill and the one to follow, the “next step” is to add a coach or volunteer defender that you must cut past, either overtop or underneath.
Drill #3 - On-Ball Cutter (Give & Go)
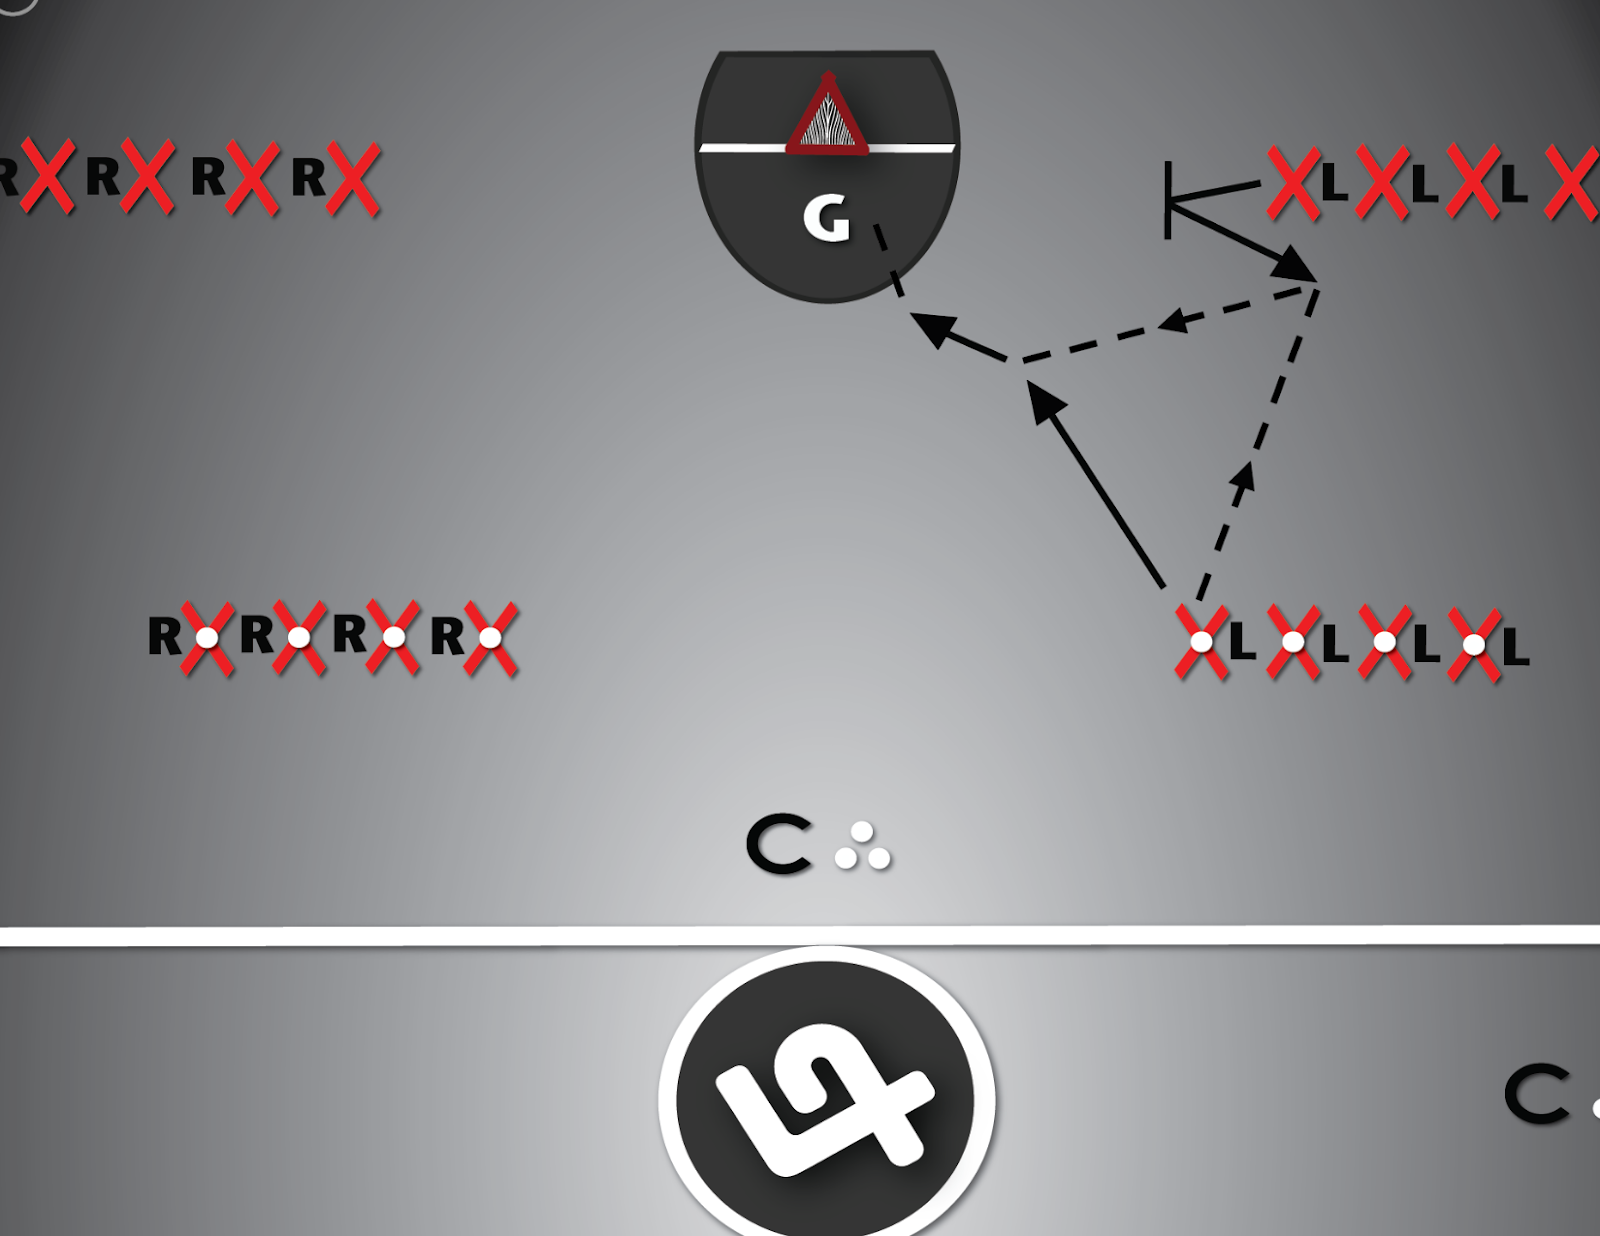
After the ball gets passed low, the on-ball cutter must learn to “delay” for a half second, which allows for the off-ball cutter to get through the middle, in theory. This speaks to the timing of the motion offense, the off-ball cutter needs to leave as soon as the ball is low, and the on-ball cutter should leave as soon as the off-ball cutter is beginning to exit the middle. The on-ball cutter then attempts to cut overtop, or underneath their check (imaginary or voluntary), and if they were open they should in theory receive the ball.
On-ball is where the magic happens! Again, it’s always going to be a fight to the middle when you are cutting. If I pass it low and then need to get around Graeme Hossack for a give-go-pass, which is the premise of the drill above, that’s likely not going to happen. That said, there are two other options “on-ball” within the motion offense: set a down pick at the crease position (most common), or set a screen at the shooter position (least common). For advanced players, they would read the situation and choose the best option. For first-timers, the extent of your set offense is usually a simple down pick on the weak-side, but not until that off-ball cutter is through, which takes a lot of practice...
Drill #4 - On-Ball Down-Pick (Crease)
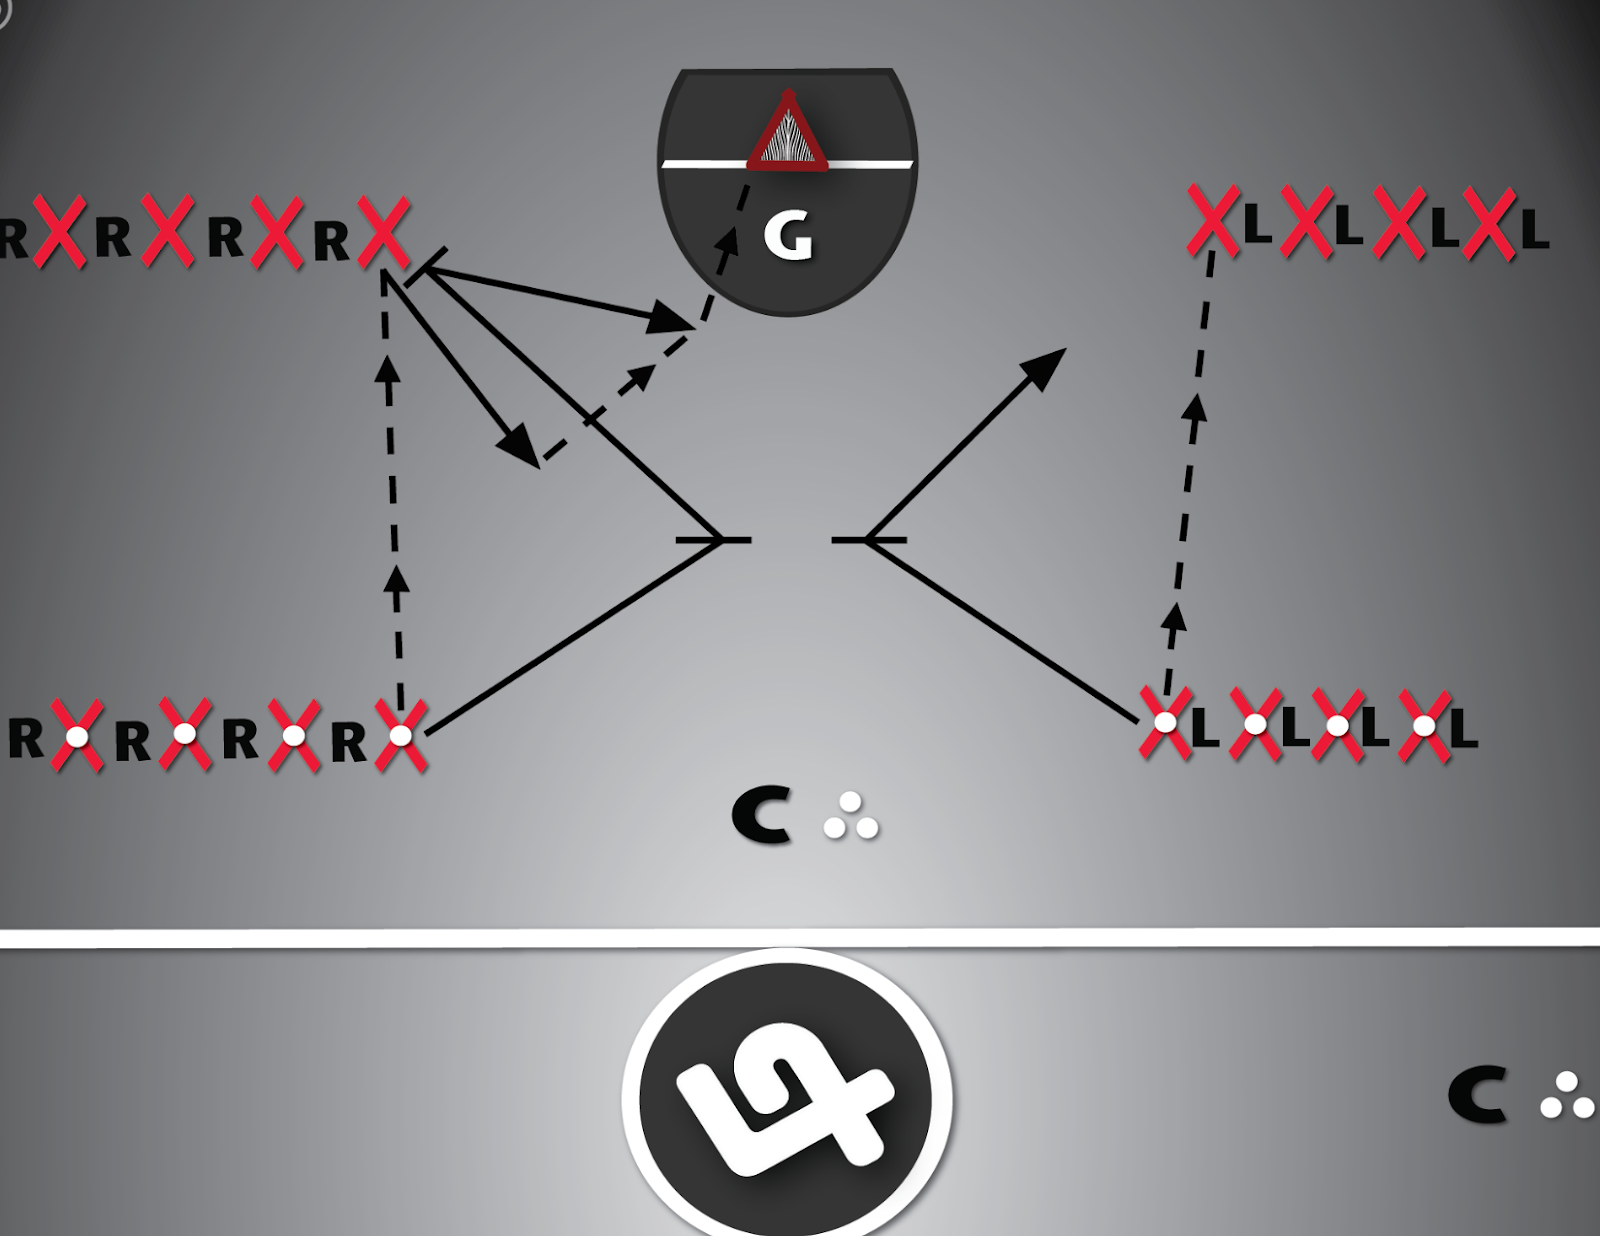
I’m not about to walk you through how to properly execute the pick & roll, which will be the focus of a future blog. I will tell you however, that I’ve done a lot of exploring on best practice for team offense in minor lacrosse.
Two summers ago I was at my former teammate’s wedding, he also happens to be my business partner’s brother, Nathan Sanderson. I got chatting with uncle Shane when I was there; Shane is one of the 4 infamous Sanderson brothers from Orangeville in the 70’s/80’s. He is also a long-standing coach in Orangeville minor lacrosse, including the head coach of their 12U rep team that has only lost one game in the last three seasons at the top level in Ontario. So I took the opportunity to ask him about how he went about running his offense? He got telling me a story about “The Peterborough Pick” and how they were always pushing the ball for fast breaks in transition, and that if no opportunity presented itself that they would run the ball deep to the far-side and immediately send a down-pick As that was happening the off-ball players would be cutting and cycling (perhaps coming from the bench on a line change). That was the whole offense! Down picks, with off ball cutters...Sound familiar?
Drill #5 - On-Ball Seal/Screen (Shooter)
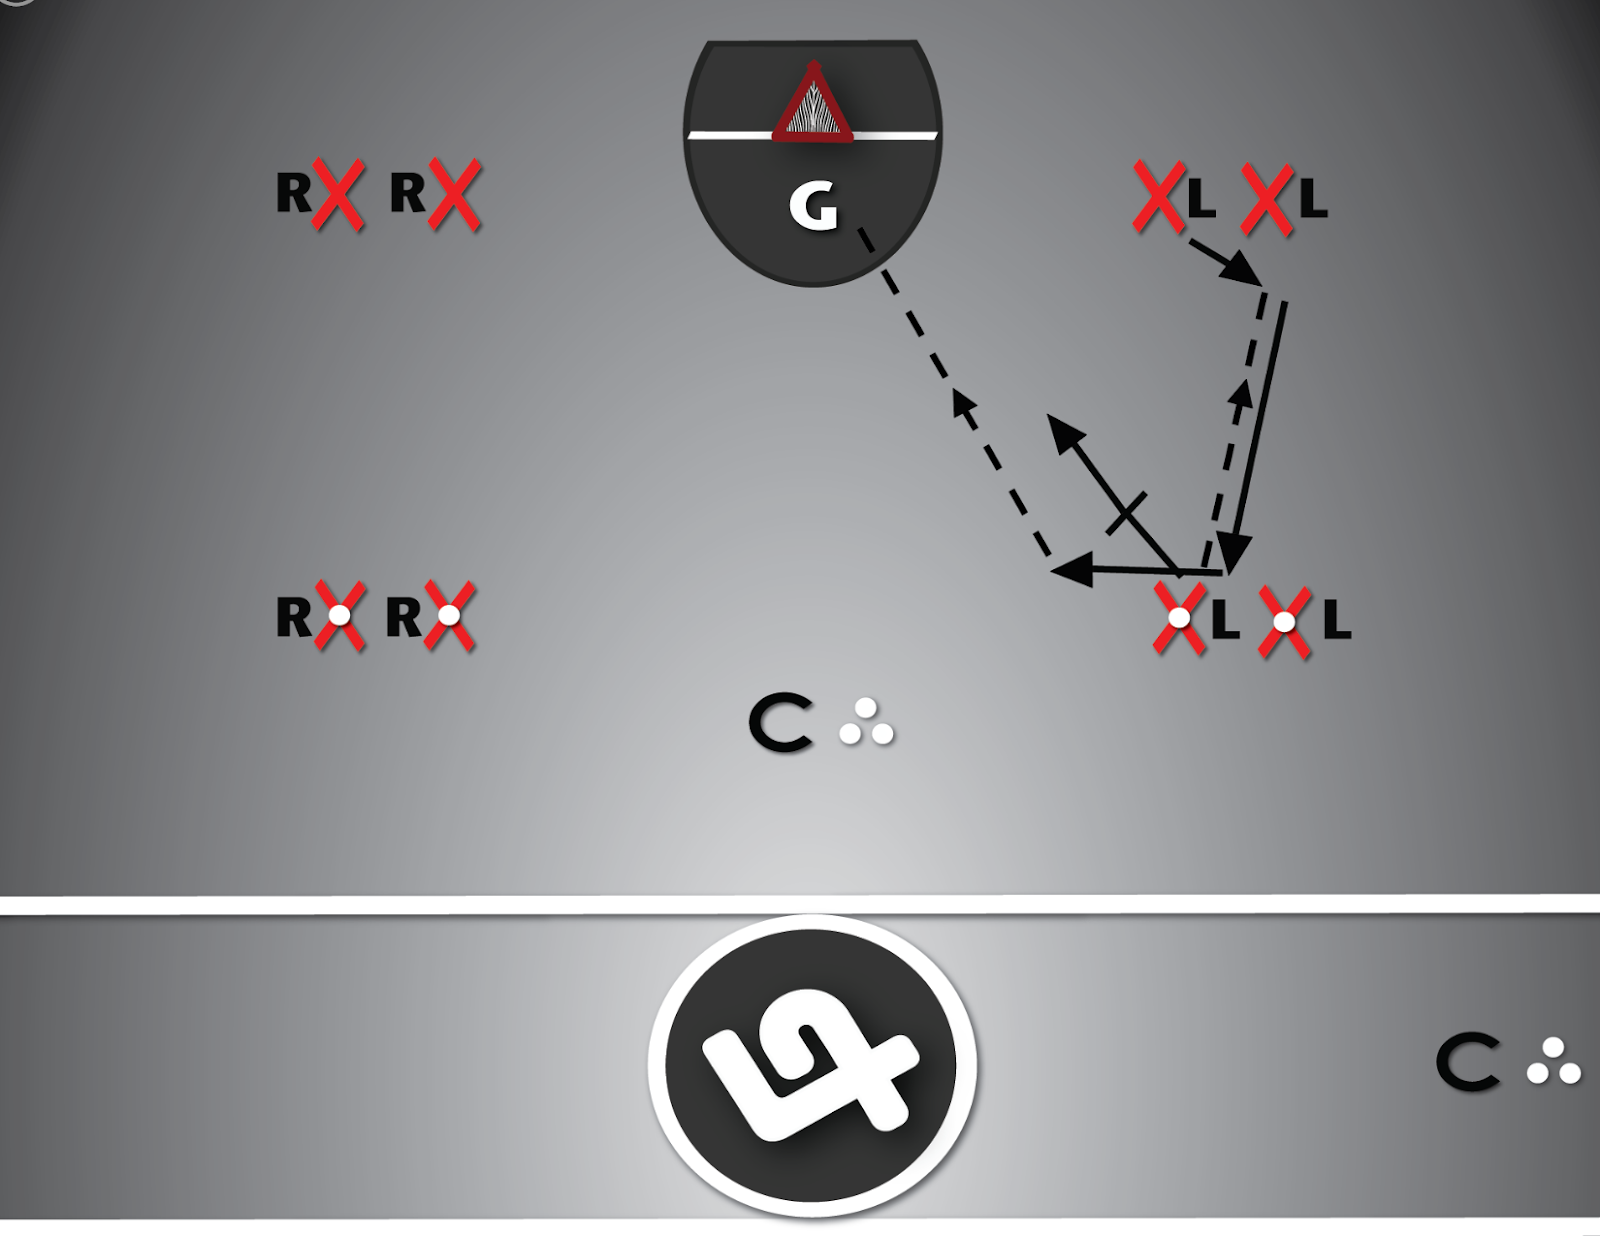
People can generally only remember 2-3 things in their working memory at at any given time, so “sealing at the shooter position” is something I wouldn’t normally discuss until players have demonstrated some sort of mastery with give & go’s and down-picks; otherwise if these actions are no longer working against regular opponents.
Again, I am not going to discuss proper sealing technique, only to say that as players get more familiar with the skills and concepts within the motion offense, eventually this on-ball cutter situation becomes a “read” by the ball carrier at the crease position, as opposed coaching players to seal the shooter every single time they pass it low on offense, which is the object of the drill above. Start with an imaginary defender and then advance to a volunteer defender, which give player a better “feel” for the situation.
Drill #6 - Six Nations Shuffle
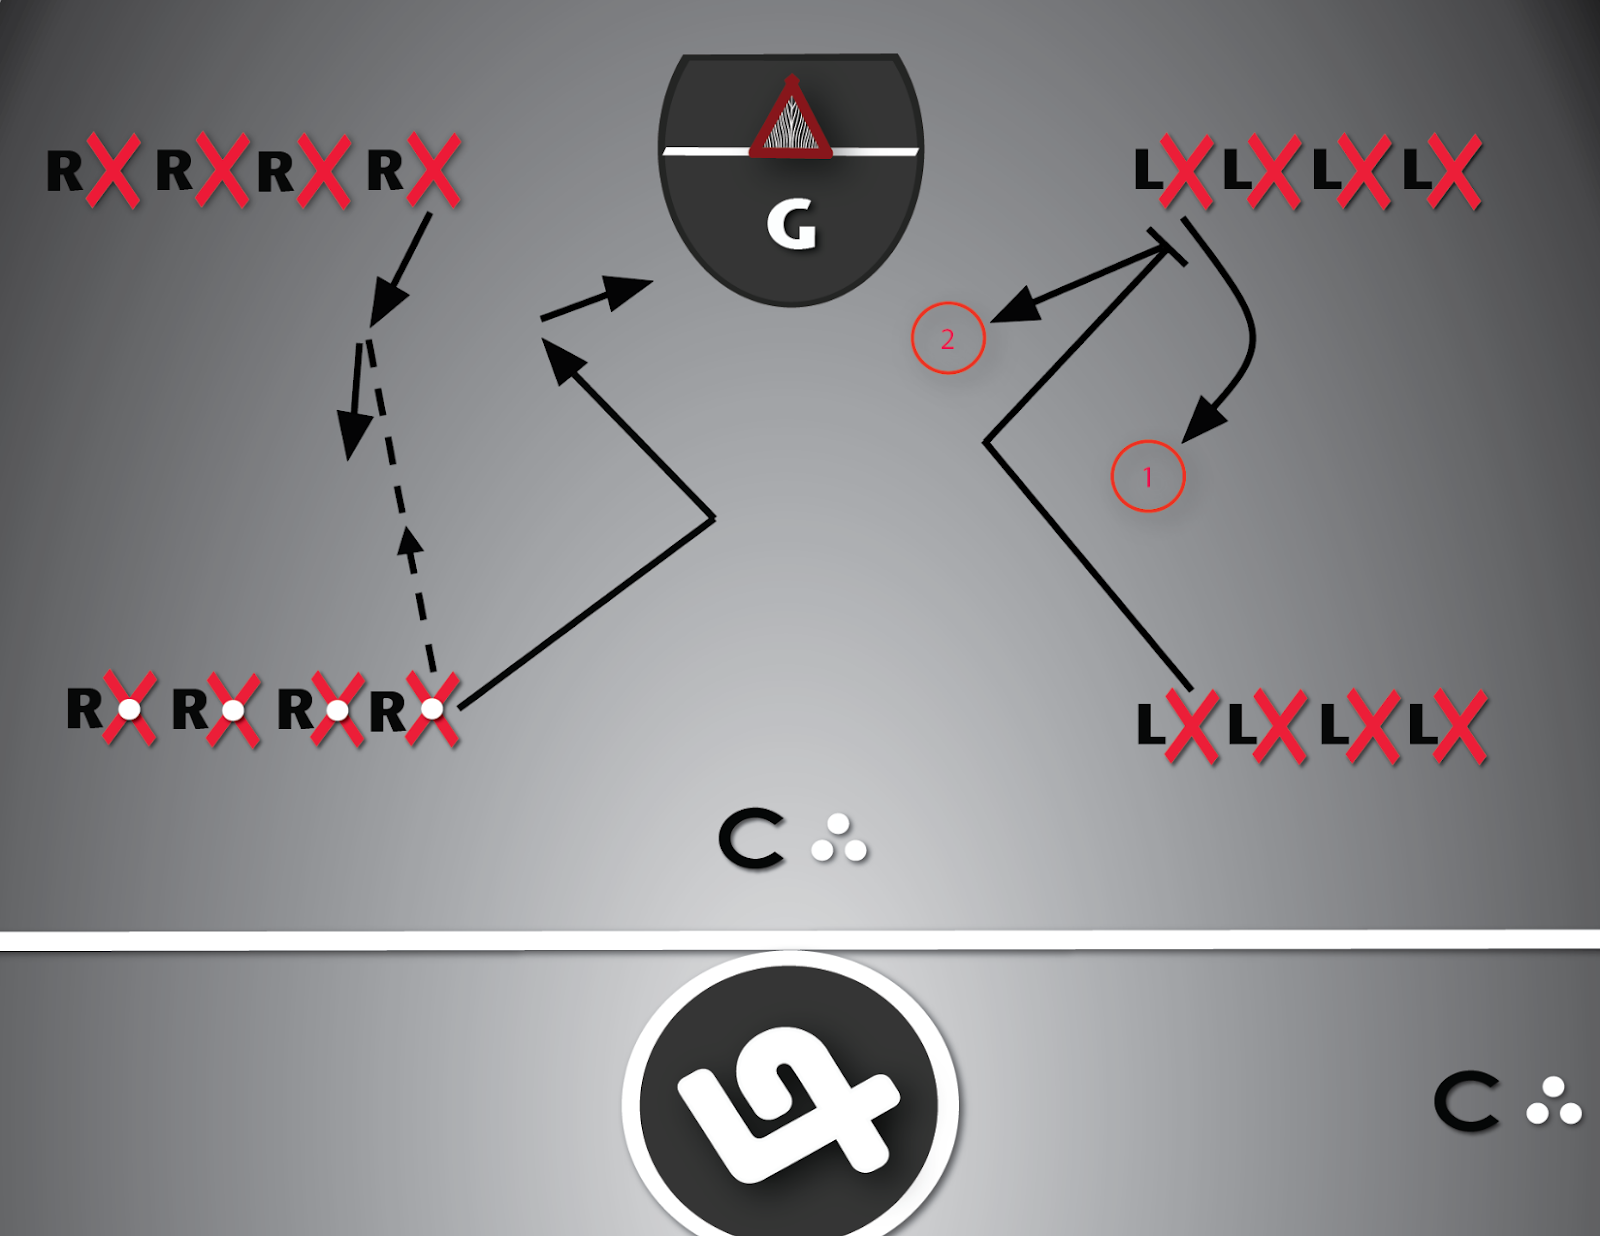
If none of the above options were open the ball carrier would carry high and shoot (which is another drill in our Shooting Series), otherwise swing it to the far side or perhaps pass to somebody who got open off of an off-ball pick after their cut (another advanced concept). At this point, players on both sides (on-ball/off-ball) would have done a full cycle/exchange of relative positions.
This “Six Nations Shuffle” is a great drill in that it allows you, as the coach, to ask for different patterns of the above mentioned drills; both on ball and off-ball working together in unison (getting a feel for the timing). There are so many variations you could do off of this drill set-up and it involves everyone in the offense (except the hypothetical point player who is the first to cut through the middle).
You could ask for the same pattern every time, or, if they are really good, you can change it up every time. Players both on ball and off-ball could either cycle (cut) through, seal or pick; the ball carrier has the option to pass to whoever they want, or to a specified person for beginners. Advanced players can get creative with how they finish after several passes.
Shout out to Scott Martin, a Mohawk man from Six Nations, who used this drill as a way to teach the concepts of team offense to one of our groups when he was out here in Nova Scotia helping coach, back in 2015.
Conclusion:
There’s no point in trying to teach this stuff if people can’t pass and catch, which is why all of the blogs in this series have been on the fundamentals of lacrosse up until now. This is really the first time players are asked to “think and play” while on offense, instead of just playing “jungle ball.”
The motion offense should be used as a framework to teach the basic skills and concepts of offense, which always apply regardless of which system is being played. With the motion offense in particular, the rules should be slowly relinquished throughout the course of the players development, with the end goal of being able to play within a Freelance Offense by the time you finish your minor lacrosse experience. It is a give & take relationship between the coach and the players, and sometimes if players continually go too far off-script, they will need to be held accountable.
Although to freelance literally means “to work for yourself, with no allegiance to anyone,” a successful freelance offensive system actually still has set team rules to provide structure and balance on the floor (developed based on team personnel + individual skill-sets).
Freelance is the style of offense that is used most often in Junior & Senior “box” lacrosse, promoting swinging the ball, plenty of motion, pick-and-roll game; and limited in its use of set-plays (except where trying to utilize the best attributes of the teams most skilled players). In other words “pass, pick, pop/roll, replace, cut, shoot” as Casey Powell describes it. Spread the defense by staying wide, while also adjusting your position to help create open passing lanes and seizing opportunities to be a threat; both on ball and off-ball. Avoid the temptation to creep towards the ball, and do not allow the off-ball defenders to sag and stand in help positions; keep them engaged with hard work and tenacity.
From there, offensive players should be watching the positioning of their offensive teammates in order to help with the timing of the “cycle” or set-play, being mindful of proper spacing. They should also be watching the positioning/personnel of the defensive players, exploiting weaknesses and watching for opportunities to get open for a high percentage shot on goal (i.e. following slides, back-cutting defenders, etc.). All players on the floor need to be involved/engaged in order for there to be any sort of continuity or "flow" to high level team offense. If you are not moving your feet you are not involved. Furthermore, an offense that doesn't get open in the middle, will not be successful in the long run.
For further interest in offensive systems which still apply the same rules and concepts of the motion offense, please also see the Dingo’s Mid-Board Cycle & Linds’ Drive Down Cycle.
Beginner Lacrosse Drills: Shooting
There are 2 styles of shot in lacrosse: shooting-on-the-run (which is the most frequent) & set-shooting (which is the focus of this article). Using a basketball analogy, for a set-shot think Steph Curry with his feet set, perfect balance, dropping a bomb from long range with perfect form. For a shot-on-the-run, picture Michael Jordan or Kobe Bryant slashing to the net and pulling up for an off-balance jump shot.
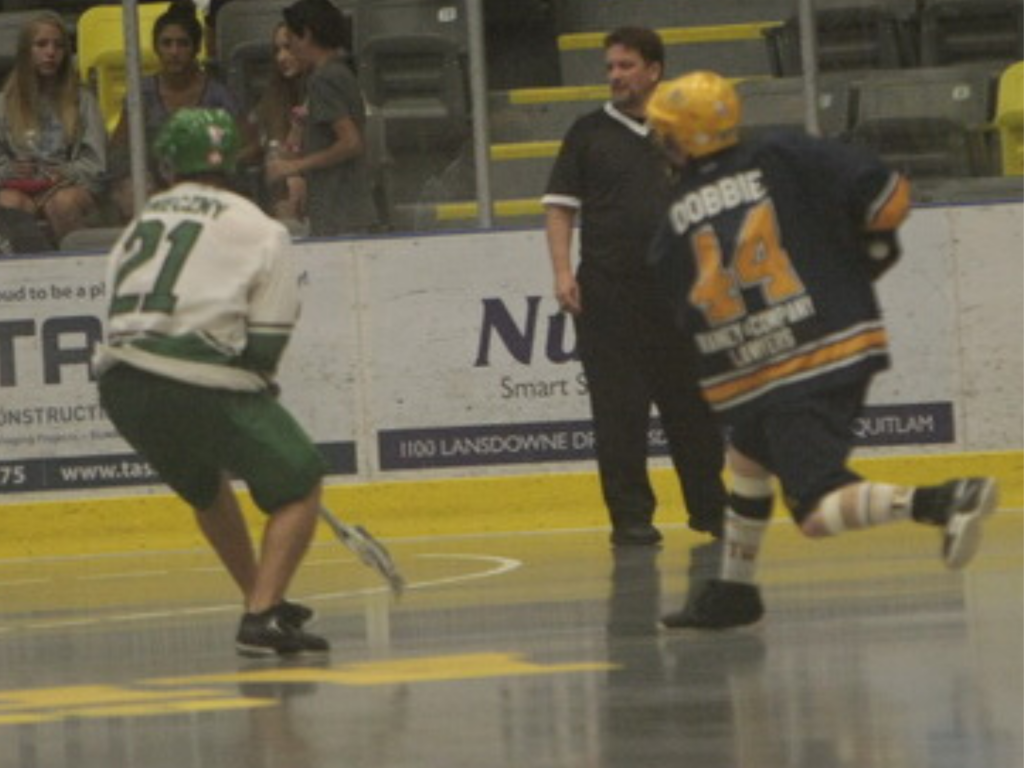
Set-Shooting sees the shooter start perpendicular to the net, taking a “crow hop” for extra power if “time & space is available
In lacrosse, when offenders get “time & space” in the prime scoring area, usually their first option is to take a “set-shot.” A good set-shot starts with a player standing perpendicular to the net, taking a baseball-like “crow-hop” if they have time, and then transferring their weight from their back foot forward onto their front foot; rotating their hips/shoulders (torso) and following through (shooting around the pipes). When set-shooting, remember the BEEF principles: Balanced (stance), Eyes (on target), Elbows (reaching back, tight to the body) and Follow Through (towards the target).
The following is a list of drill progressions we use at Laxlife.ca to teach set-shooting, all of which could also be used to teach shooting-on-the-run...
Drill #1: SEMI-CIRCLE (HORSESHOE) DRILL

The horseshoe drill is a great starting point for teaching set-shooting to a large group. Although, if boards or a wall are available, doing a demo and then having players practice (warm-up) there for a couple of minutes before shooting on the net is usually best for beginners.
Using the net as a reference point helps teach players where they should be shooting from. In box lacrosse, players should always practice shots from inside of the "prime scoring area," on their "proper floor side."
The prime scoring area is defined as two imaginary diagonal lines going from each goal post outward on a 45° angle towards the side-boards. Just outside of the shooter position another imaginary semicircle (8-10 metres out from the top of the crease) connects to just outside of the other shooter position on the opposite side of the floor, forming an arc that ultimately connects to the diagonals (45°). Shots from this area are considered to be “high percentage,” as a higher percentage of goals are proven to go in from this area than anywhere else (consider duct taping this formation onto the floor during practice).
Prime Scoring Area

Players should also be sure to take shots from their proper floor side, defined as a lengthwise “imaginary division” of the floor, stretching from the middle of one net to the other; players’ sticks should be facing this imaginary midline for the large majority of the time while on the floor. Likewise, players’ bodies should rarely, if ever, cross this imaginary midline while shooting. Any shot on the “wrong floor-side” of this imaginary line is considered a bad shot, a win for the defense and a shot that the goalie should save.
If there's no goalie in the "horseshoe drill," coaches can ask that players shoot "all at once," which gives beginners a chance to get lots of repetitions. Some common errors we tend to see in beginning players are: not reaching their arms back and loading their weight onto their back foot in their preliminary movements, not releasing the ball properly (too far in front or behind their body), taking their eyes off of the target, not shooting overhand, and/or not following through to the target (stopping short; abrupt follow through).
If there is a goalie, players can take turns shooting, working their way from one side to the other (left to right or right to left), with one second in-between shots. Another more advanced variation is to incorporate side-to-side shooting, switching from a left-handed to a right-handed shooter on each shot, which forces the goalies to have to reset on each shot and ultimately opens up more holes for shooters to try and expose.
Once players have developed sound shot mechanics, coaches can ask that players “react back” after shooting, sprinting the length of the floor (collecting a loose ball along the way if possible), and then lining up in the same formation in the opposite end of the floor; or just sprinting to the rag-line (lining up again in the same end).
As players begin to stabilize their shot, footwork patterns should then be added before the set-shot takes place. The first footwork pattern, and generally the most common is the "L-Shot." The player takes a hitch-step ("jab-step") toward the board-side, planting off of their outside leg and cutting toward the middle (2-3 steps max), "setting" their feet ("perpendicular" to the net) for an outside shot. For beginners, it helps to put pylons on the floor to give a visual representation of the pattern. See the top half of the diagram below…

If per se, the L-shot didn't open up a lane for a shot, the next option in a game would be to either pass to someone, or drag (back-pedal) back towards their proper floor side. In the "drag shot" variation (see the bottom half of the diagram above), the player takes a jab-step toward the top-side (opposite of the L-shot), planting off of their inside leg and pivoting into a back-pedal ("drag") toward the "board-side." At this point the player should re-establish their momentum towards the net (north-south) and take a shot while still in the prime scoring area.
To simply pass the ball across the top of the defense is generally an ineffective strategy for creating a quality shot in a set-offense. Most offensive systems in box lacrosse see the ball get passed low first, and then carried high. During this process the ball carrier should "be a threat" to shoot. To replicate this, the next drill variation sees the first player on one side of the floor carry the ball from low to high, from the crease position up to the shooter position, and then step into a set-shot.
For beginners, pylons may be used as a visual landmark for players to curl around, progressing to having their "head up" looking at the middle while "carrying high" (as opposed to looking at the pylon they are running towards). This forces players to have to work on changing their body momentum from one direction to the other, in a north-south orientation. In a game, players would be reading the defense and taking whatever ground they could get towards the middle of the prime scoring area.

Drill #4: CATCH & SHOOT (STATIONARY)
The next progression after learning how to shoot with the ball already in your stick is effectively catching and shooting the ball as seamlessly as possible. The ideal catch and shoot scenario sees the ball in the air with the player about to receive it already "crow-hopping" towards the net, receiving the ball with arms fully extended behind their body, catching and shooting seemingly all in one motion (not quite a quick stick).
For first timers, coaches can underhand flip the ball to the player (with their hands), encouraging the player attempting to catch and shoot the ball without cradling (or twirling) their stick. If players are competent enough, they can pass lefties to righties & vice versa (as seen in the two diagrams below), working on the same mechanics as described above.

Drill #5: CATCH & SHOOT (DYNAMIC)
The most advanced variation of shooting is for players to catch a lead pass in stride (gradually building up their running speed), shifting their momentum downhill (north-south) and taking a set-shot as quickly as possible upon receiving the pass (ideally all in one motion if it’s a good pass). This is the most game-specific shot and the model for what players should try to be able to execute consistently. See the diagram below…

CONCLUDING THOUGHTS
The final piece of the puzzle is knowing when to, and when not to shoot; otherwise known as shot selection. Shot selection is a mental process of either taking a shot or passing a shot up (not taking a shot). Being ready to shoot and in the “triple threat position,” is half of the equation. The other half depends on game-specific context variables, most notably: whether there is an open “shooting lane” toward the net and whether or not the shooter has "time & space." Too often, beginning lacrosse players will take the first shot available and not necessarily the best available shot (shot clock dependent).
Players must use good judgment before taking low percentage shots outside, or on the cusp of, the prime scoring area. It is usually better to “curl” out and look for a teammate who is in a better position, rather than take a low-percentage shot.
Shot accuracy and knowing where to shoot on a goalie is the final x-factor, and is usually the responsibility of coaches and “scouts,” although input from players and goaltenders are equally as important.
Beginner Lacrosse Drills: Dodging (Ball Protection)
Once basic ball protection has been covered off in both static and dynamic fashion (as seen in our Basic Practice Plans), the next step is to “make moves” to get around defenders, learning how to change directions and change speeds while manipulating the lacrosse stick.

The way to protect the ball in lacrosse, as in most other sports, is to keep your body between the ball and the checker.
A dodge is a quick movement (or fake movement), usually toward the opponents net, with or without the ball, using quick foot and sometimes arm/hand/head movements. There are many different styles of dodges, described primarily by the action taken toward the net, usually beginning just beyond a sticks length away from a defender.
Whether it’s box (indoor) lacrosse or field (outdoor) lacrosse, the following dodges will allow players to get more quality scoring opportunities, which for most new players translates to "fun" while playing the game of lacrosse.
Skill # 1: THE JUKE
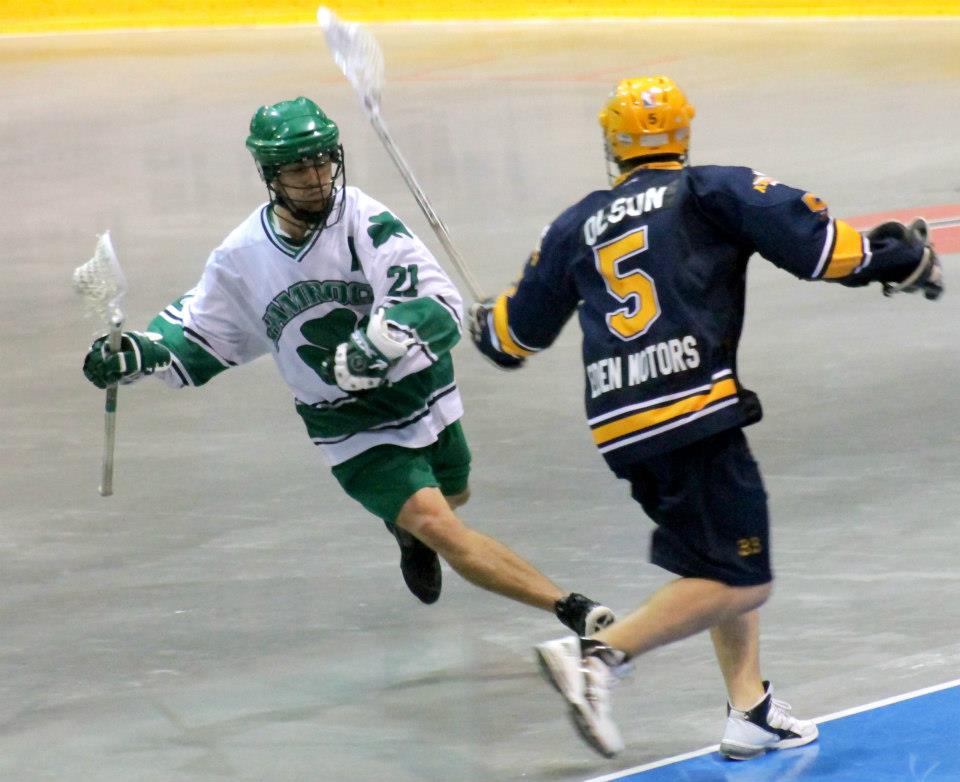
If this juke were in the offensive zone it would be important to keep two hands on the stick (“triple threat position”) while executing the movement. A juke is the most basic dodge in lacrosse.
A "juke" is a fake cut one way (“jab-step”), then planting hard off of a stiff outside leg while the inside leg is bent and parallel, eventually extending explosively in the opposite direction. Off-ball, a quick “side step” in one direction and then moving in the opposite direction is often enough to engage one’s check and keep them off balance. It is also very common for offensive ball carriers to “jab-step" then try to beat their check overtop for a sweep shot.
Otherwise known as a “counter-step” or “hitch step,” these “steps” can be utilized to deceptively mask a ball-carrier’s true intention, and later be combined with other dodges, like the face dodge or roll dodge.
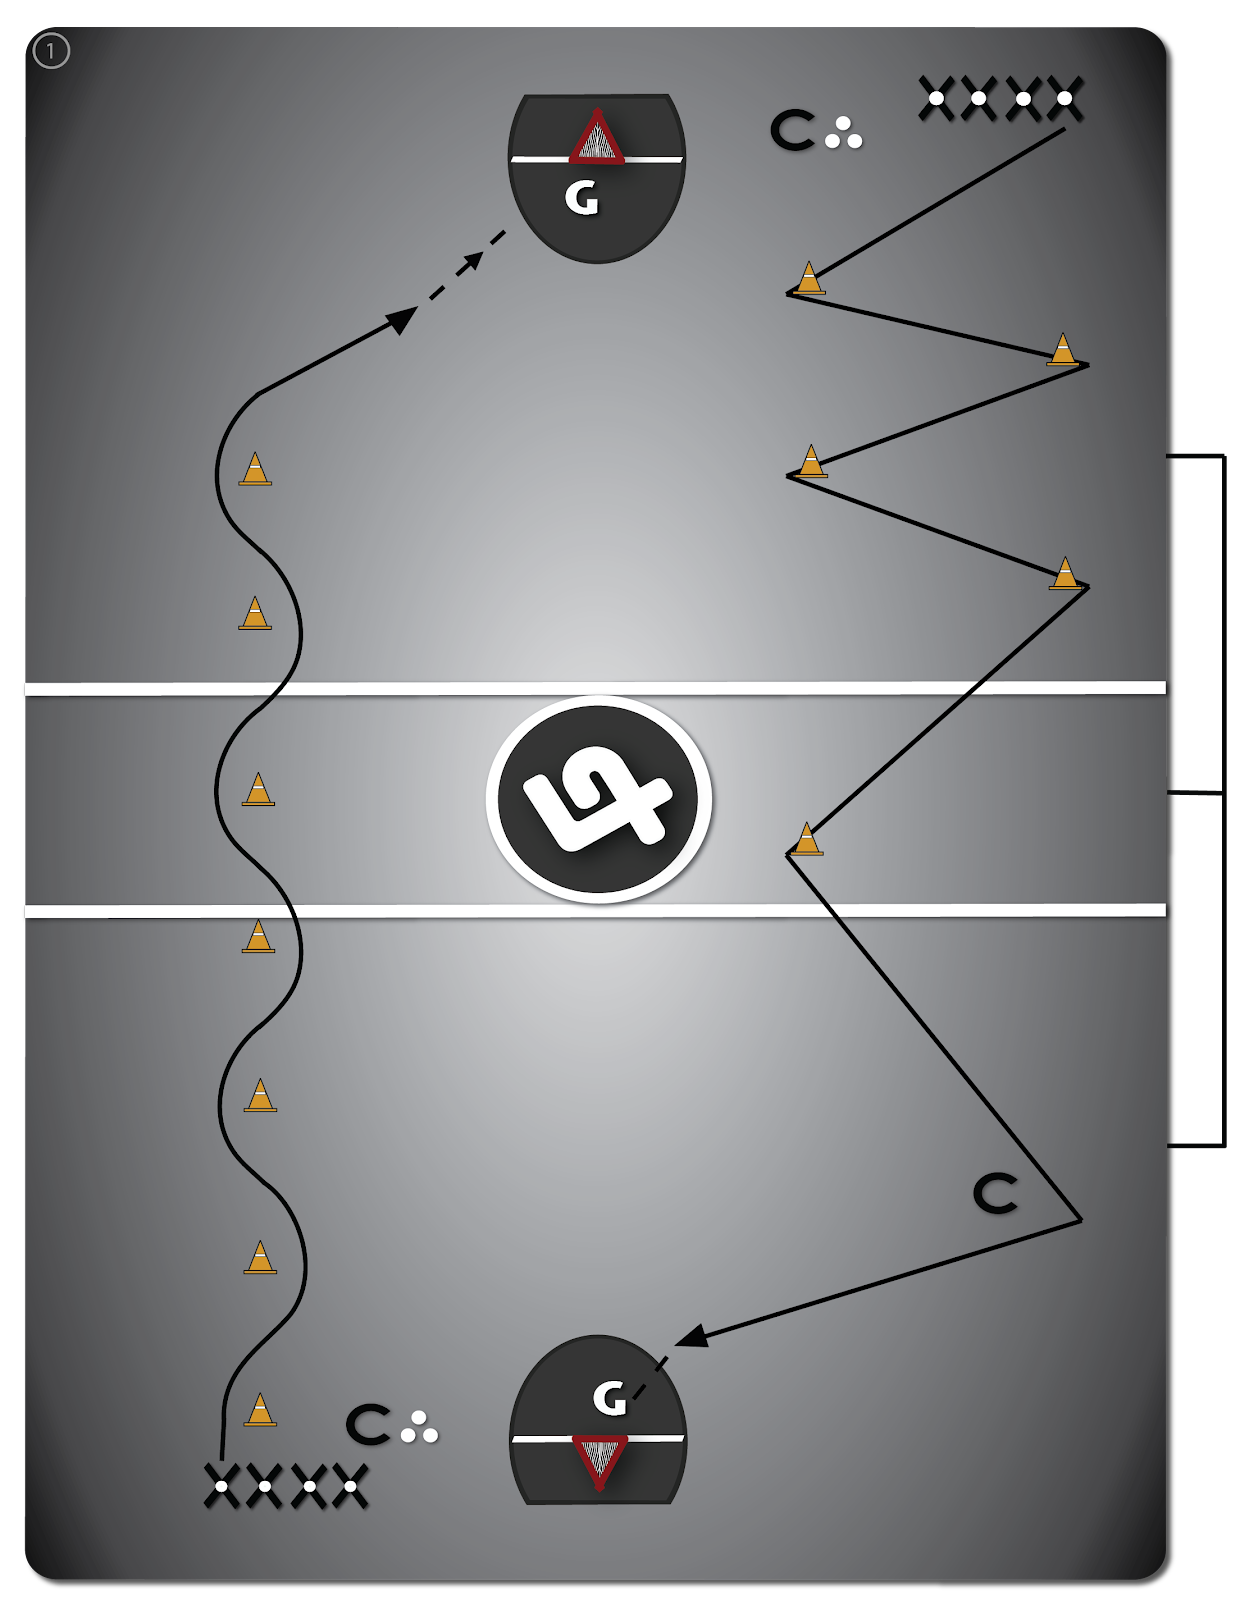
Drill #1: “Dodging Around Cones”
Skill #2: THE ROLL DODGE
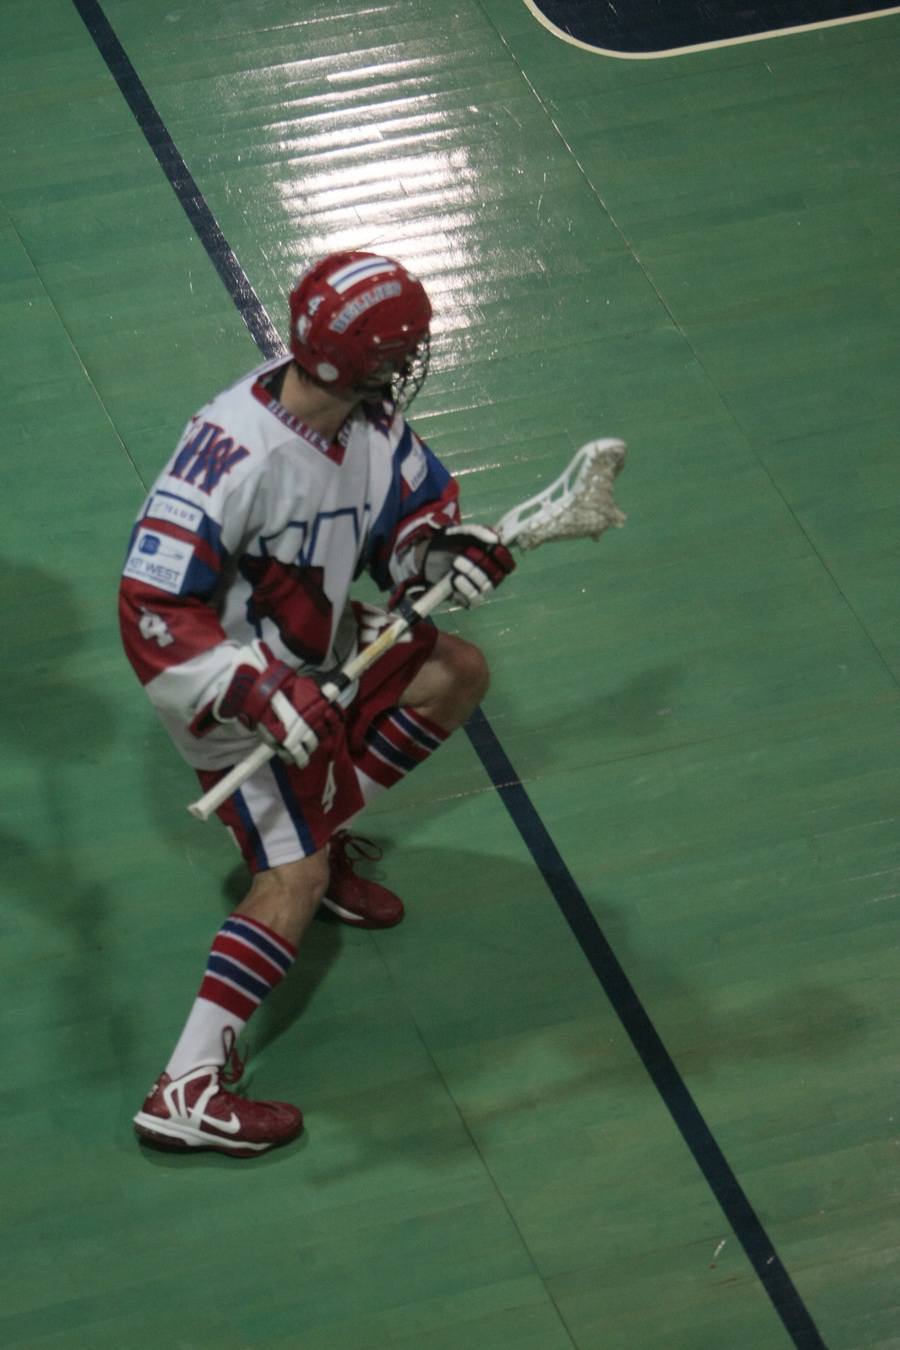
A roll dodge can be either clockwise or counter clockwise, exploding in the opposite direction while pushing off of the outside leg (careful not to leave your - butt-end hanging out!!!)
A “roll dodge” is a 180° or full 360° rotation of the body while engaging a defender, which can also help protect the ball as a player carries it toward the net. The roll dodge is usually accompanied by some sort of change in direction (usually east-west in orientation) and is sometimes used by players to free their hands for a shot on goal. It could be a drop-step "underneath" or spin "overtop" of the defender.
Where the opportunity presents itself, offensive players should roll dodge toward the butt-end of the defender’s stick ("away from their stick"), initiate contact with their lead shoulder from approximately a sticks length from the defender, and accelerate out of the dodge.
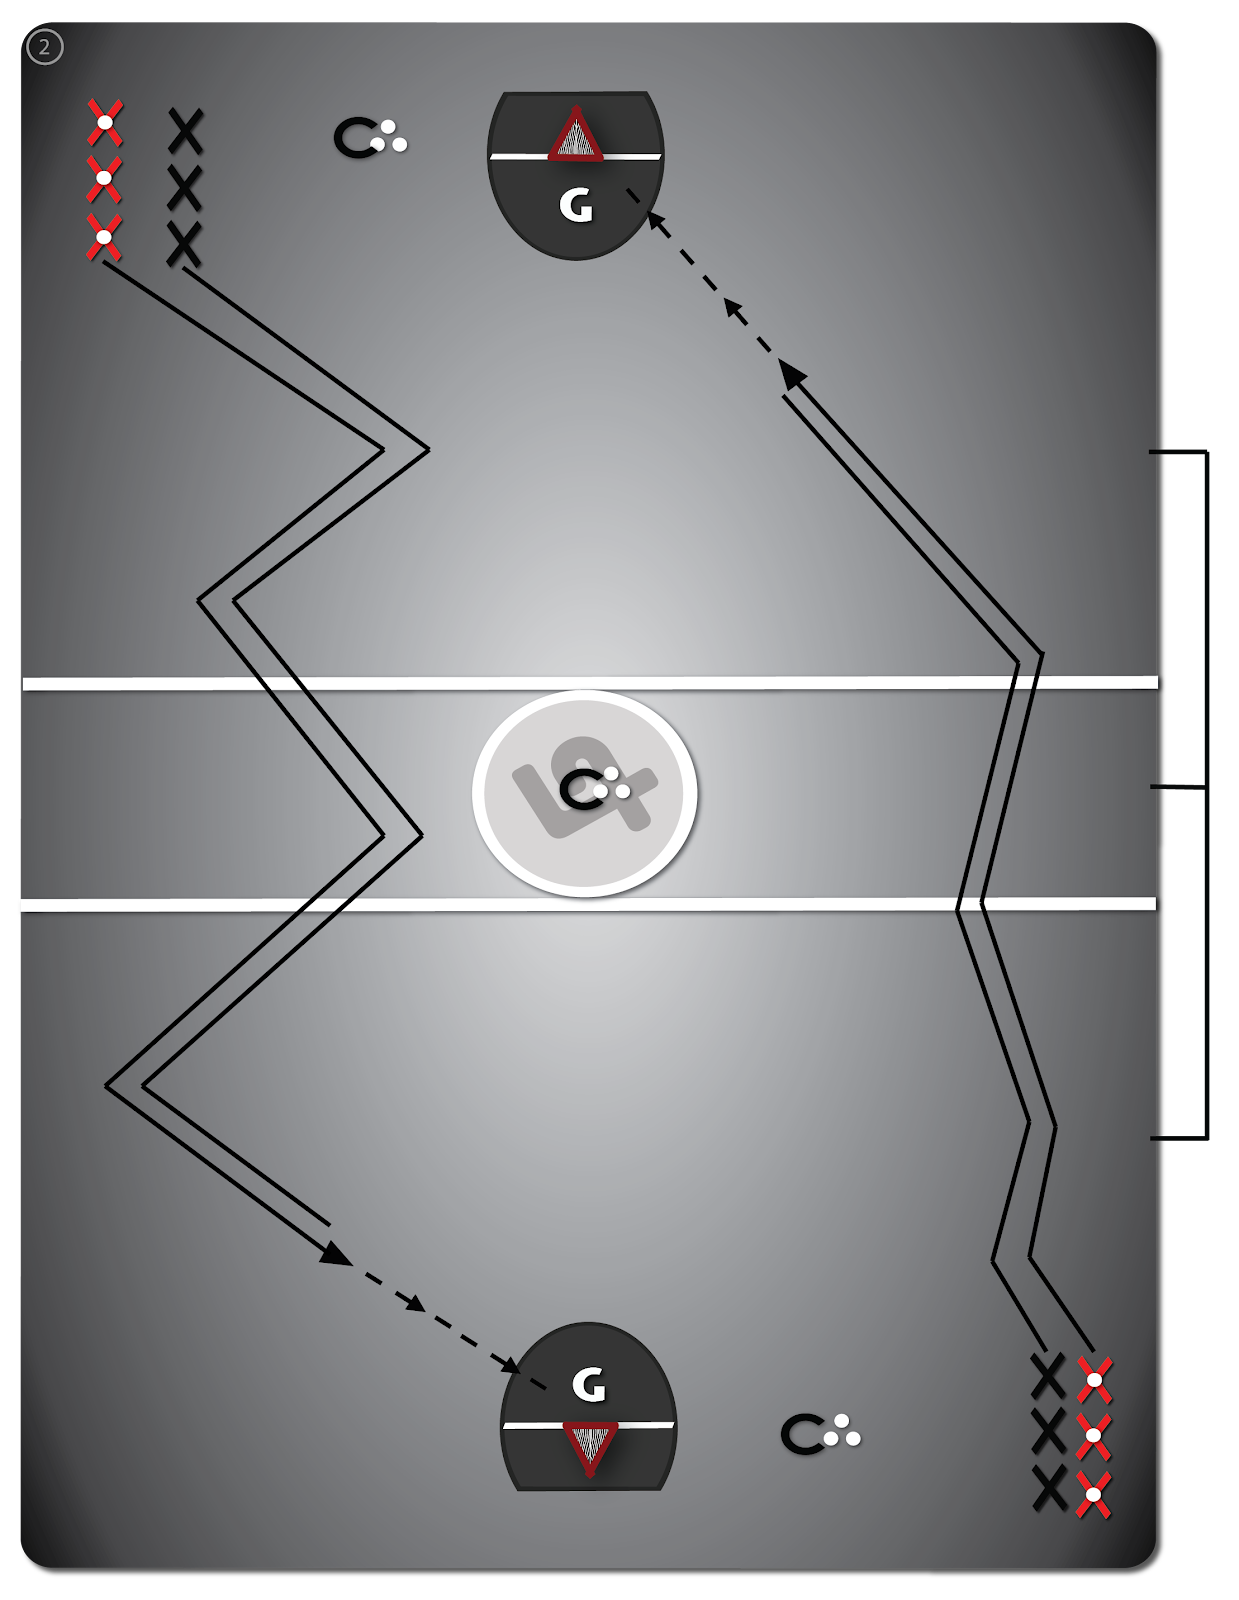
Drill #2: “Open Floor Dodging & Checking”
Skill #3: THE FACE DODGE
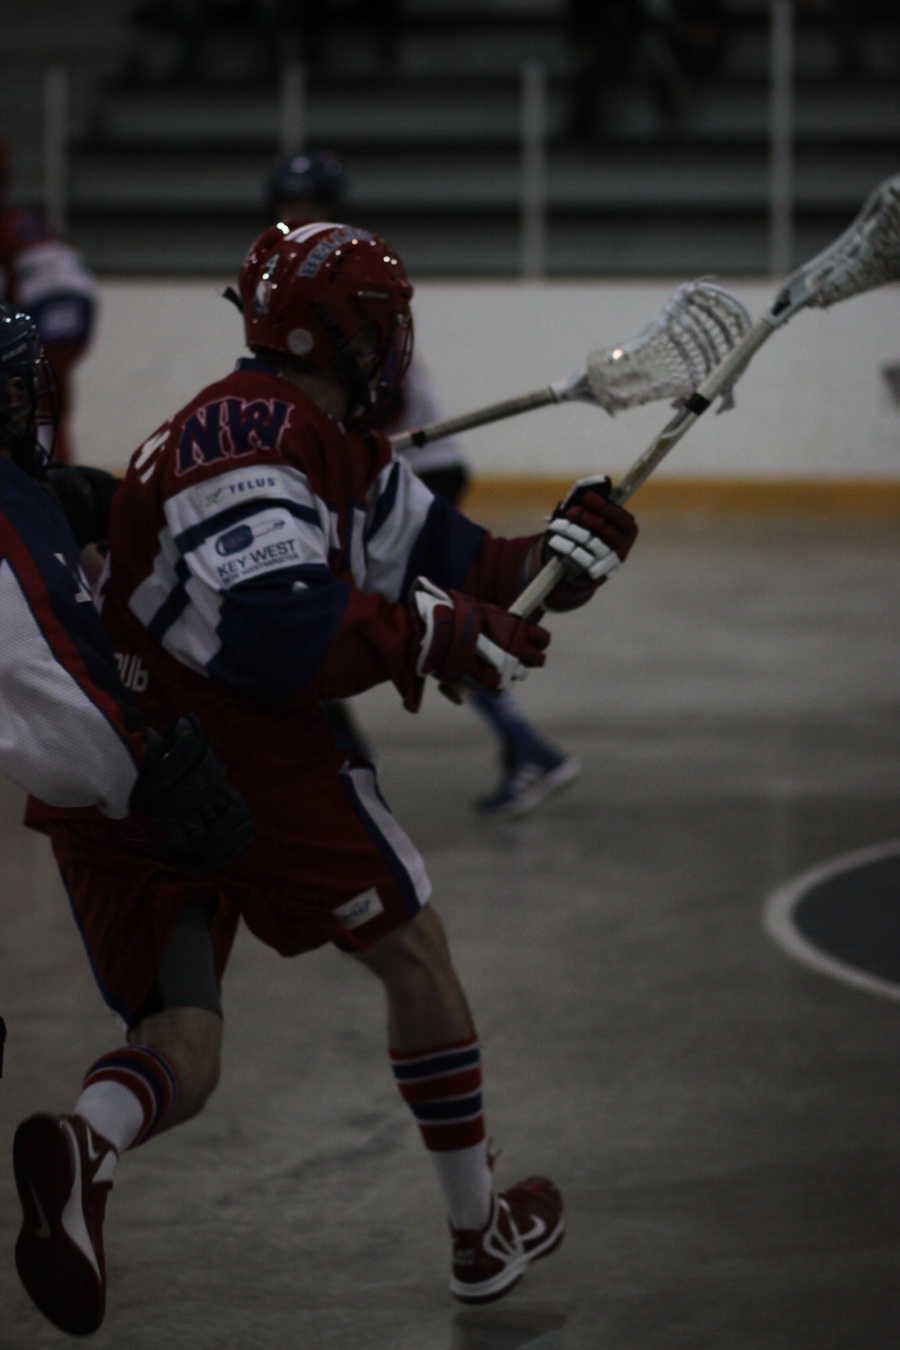
The "face dodge" is one of the most common dodges you will see in lacrosse whereby a ball carrier brings the ball across their body (their "face"), rotating their hips and accelerating out of the dodge, all while keeping the ball “tucked in” and tight to their body; it is a classic move when set-up with a fake shot (“crow hop”). This move and others are utilized to get around aggressive defenders, or to free up time & space for a quality shot. Where the opportunity presents itself, offensive players should attack the butt-end of the defender’s stick ("away from their stick") at roughly a stick's length away.
Drill #3: “Dodging In Traffic” Shuttle

CONCLUDING THOUGHTS:
The ideal scenario where all three of these dodges can be incorporated into one series of dodges would see the defender catching a pass, attacking their defender with a quick juke, face dodging underneath, and then when the defender is trying to catch up with them, roll dodging back overtop for a screen shot; or in a perfect world, leaving them naked in front of the net with the goalie. The timing of the dodge cannot be understated, and the art of dodging lies in knowing exactly when and where to dodge. If the beginning lacrosse player incorporates these dodges into their game, they are going to have much more success (fun).
Beginner Lacrosse Drills: Loose Balls
Assuming the basics of scooping through the ball, trapping & scooping, “scoop-tuck & turn,” and “scoop to triple-threat” have been covered off in both static and dynamic fashion (as seen in our “Basic Practice Plans,” the next step is to start preparing players to get loose balls in traffic (against an opponent). Little nuances such as boxing out, “keeping it alive” for a teammate to come in and scoop it, other times poking at, kicking or batting the ball to gain an advantage, all come into play; all of which are worthy of drills in and of themselves!

Being “two hand tough” on loose balls means keeping two hands on the stick even when you know you are about to take a slash across the forearms
Drill #1: “Stationary/Dynamic Loose Balls”
As a Warm-Up prior to all out competing with an opponent, players can practice several variations of stationary (Variation #1 - Top Diagram Below) and dynamic loose balls, depending on their skill level. To recreate the feel for “scooping through” a loose ball in traffic, players can eventually pair up, with one partner putting their stick flush behind the ball as the other partner comes in and scoops through the ball/stick (Variation #2 - Bottom Diagram Below). After picking it up they can practice tucking it in and running to open space, afterwards setting up the same situation for their partner to practice. Players could also practice knocking the stick out of the way and boxing-out, then trap & scooping the ball and getting their hands up into the triple threat position. There are many combinations of loose ball skills and situations you could practice. Another more advanced variation is having one player ready to scoop a loose ball while the other tries to poke at their bottom hand, in an effort to interrupt their rhythm.
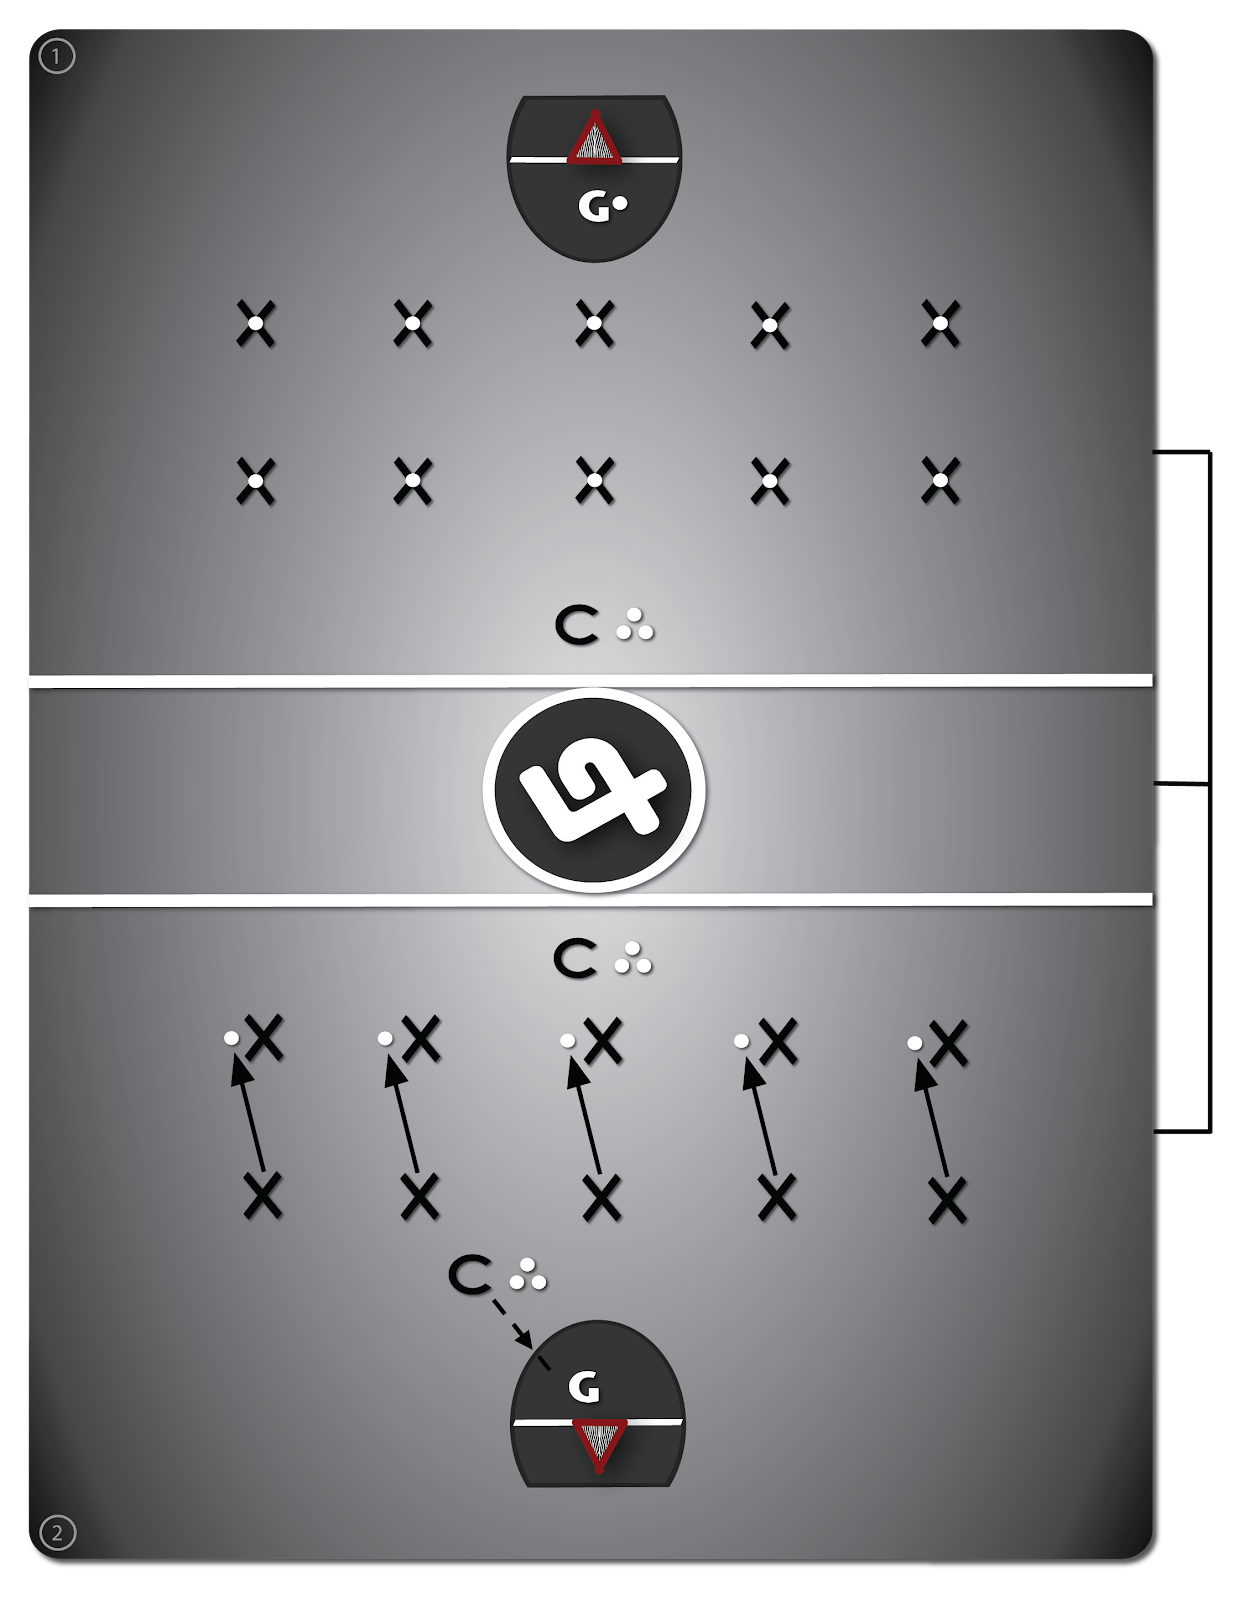
Drill #2: “Loose Balls - Sans Pressure”
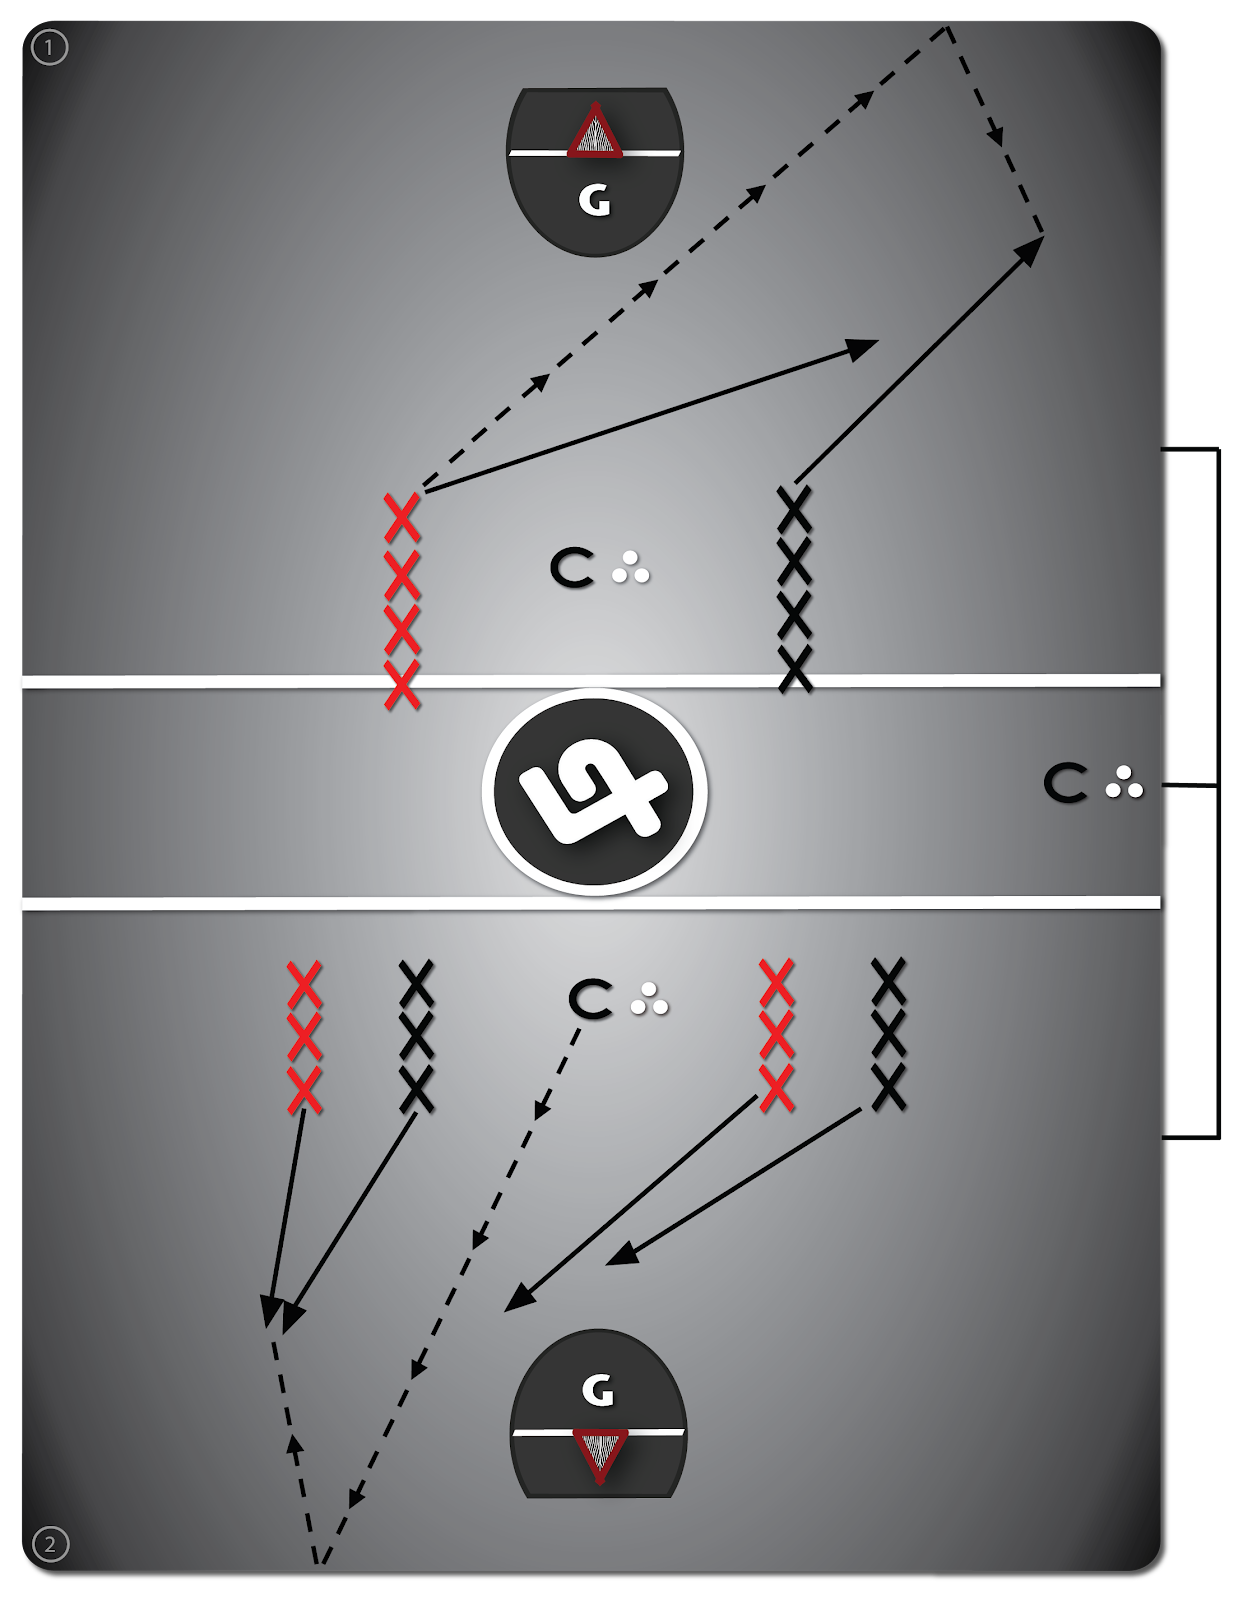
We have thus far started our drill series on a continuum building up from stationary, to pursuing loose balls with no pressure, eventually getting to the speed and pressure of a real live 50/50 loose ball battle. The drill below could be skipped for more skilled players, but for beginners it is perfect for practicing Attacking Loose Balls with speed as they are coming off of the boards, and protecting it once you’ve got it. After the player corrals the loose ball they should run it back towards the middle of the floor and put it into the pile in front of the coach, which represents what you would do after collecting a loose ball in the defensive end of the floor (Variation #1 - Top Diagram). The goal of the drill is to get lots of reps of full intensity loose balls, reacting to them upon first sight (coach is standing behind players).

Variation #2 (Bottom Diagram) is similar in orientation but represents a loose ball near the offensive end of the floor. Players get the loose ball off of the side-boards instead of the corner, collecting the loose ball and running quickly to the net for a shot (representing a broken play in the neutral zone). It also adds a bit of a fatigue element to the subsequent loose balls (and shots), which will be harder to execute successfully as the drill goes on.
Drill #3: “Loose Balls With Pressure”
Next, consider adding a real live element of pressure (Variation #1), whereby two players go into the corner for the loose ball, with one player having a head start over the other. The player trailing the play should stay close enough where if the player ahead of them misses the ball they can attempt to get it, but otherwise applying pressure on the player as they attempt to clear it out of the “defensive zone.” Players should explore different match-ups so they get to go against players with the same and different measures of the size, speed and strength.

Variation #2 changes the location of the loose ball to an area of the floor that requires less spatial awareness (i.e. no crease), but also adds the element of having to pass the ball back to the next person in line behind you in line, mimicking a support pass while Breaking Out up the floor (scoop-to-triple threat). Players also begin side-by-side this time, with one of the players behind them rolling the loose ball in to start the play.

Drill #4: “Loose Ball Battle”
Lastly have players compete for 50/50 balls, which means players are starting side-by-side on each side of the coach, with the coach behind the players who are facing the corners. Upon first sight of the ball, players run into the corner and “battle” for the ball. Whoever comes up with it can either run it out of the drill, otherwise they may be given a chance to explore playing some one-on-one for 5 seconds, before sending a ball into the opposite corner.
Advance to 2 vs. 2, which requires players to work in tandem, and utilizes a lot more finicky maneuvers, which should be the focus in drills moving forward. The Box-Out Drill for instance, is especially important for players in these types of tight quarters, helping differentiate from what may otherwise be called as minor interference if performed incorrectly. Loose ball battles should frequently be re-hashed upon throughout the course of a season, ensuring that effort and physicality on loose balls is always high in any drill performed moving forward.
CONCLUDING THOUGHTS:

At the end of the day, the team that wins the most loose ball battles usually ends up winning the game. More loose balls (also known as “ground balls” in field lacrosse) translates into more possession, which usually effects other variables such as: momentum, multiple re-sets, shot totals and fatigue. The biggest determining factor in getting a loose ball is hard/effort, which generally comes from developing your anaerobic capacity off the floor; and having the will to compete. Battling to keep the ball alive for a teammate is sometimes just as important as picking the ball up for oneself. The best loose ball players have a 6th gear they can kick it into and somehow come out of a corner with the ball against two opponents. They simply want it more.
Beginner Lacrosse Drills: Basic Defense
Outside of the fundamental footwork described in our FREE "Fundamental Lacrosse Practices," landmarking the top-shoulder of your check (the person you are covering defensively) while in a "closed stance," is the proper defensive technique when checking a player on the ball-side of the defense.
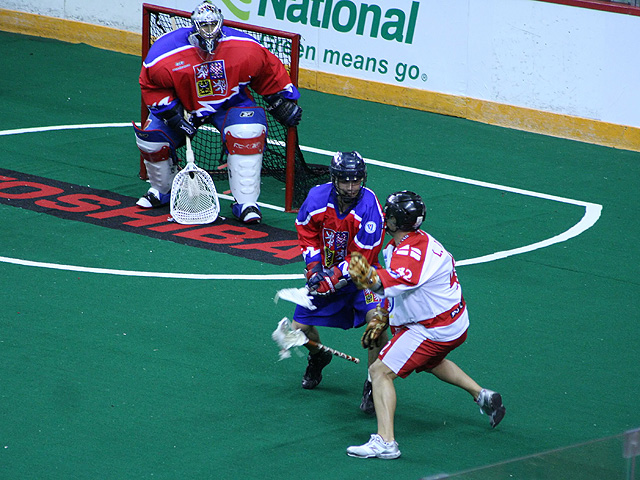
Denying underneath while playing “top-side” defense at the crease position during the 2007 World Indoor Lacrosse Championships in Halifax
Players need to learn how to play top-side defense while defending at all 5 positions of the "House" which is essentially the inverted coverage of the prime scoring area, in the shape of a stick-figured house (box + triangle). It covers both crease positions (low), both shooter positions (high corners) and the point position (top-centre), both on-ball and later off-ball. It is often useful to first show this basic defensive framework to the players before having them practice defending each of the different areas of the floor.

A "House" defense is a zone defense and the most basic system used to teach defensive principles to beginners
Drill #1: "On-Ball Shadowing”
The drill below gives players a chance to "shadow" the movements of the offensive player while playing top-side defense. The offensive player must stay behind and between the two pylons (which are set up at the crease and shooter positions) for the first 5 seconds, before a second whistle signals that they may now take it to the net (1-on-1). The offensive player then gets another 5 seconds to get a quality shot, perhaps using some basic dodges learned in a previous practice. The defenders job then becomes not to get beat over-top, nor to get beat underneath, and otherwise to contest any shot taken from the offensive player’s proper-floor-side.

Defenders must stay square to the top shoulder of the ball carrier as they make "moves" between the pylons and the coach blows the whistle for a 1-on-1 after approximately 5 seconds
Drill #2: "Recover Top-Side”
Inevitably defenders will find themself trailing the offender, having been beaten top-side. However, the play is never over and it is possible to reclaim the top-side by taking the right angle when recovering. The last resort is a trail check scenario, which is a more advanced concept. Beginners should just concentrate on realigning with the offensive player’s top shoulder and they will be successful.
This drill starts with the defender underneath the offensive player, hip-to-hip (shoulder-to-shoulder), at the crease and shooter positions on both sides of the floor. The defenders job is to reclaim the top side and avoid giving up a quality shot.
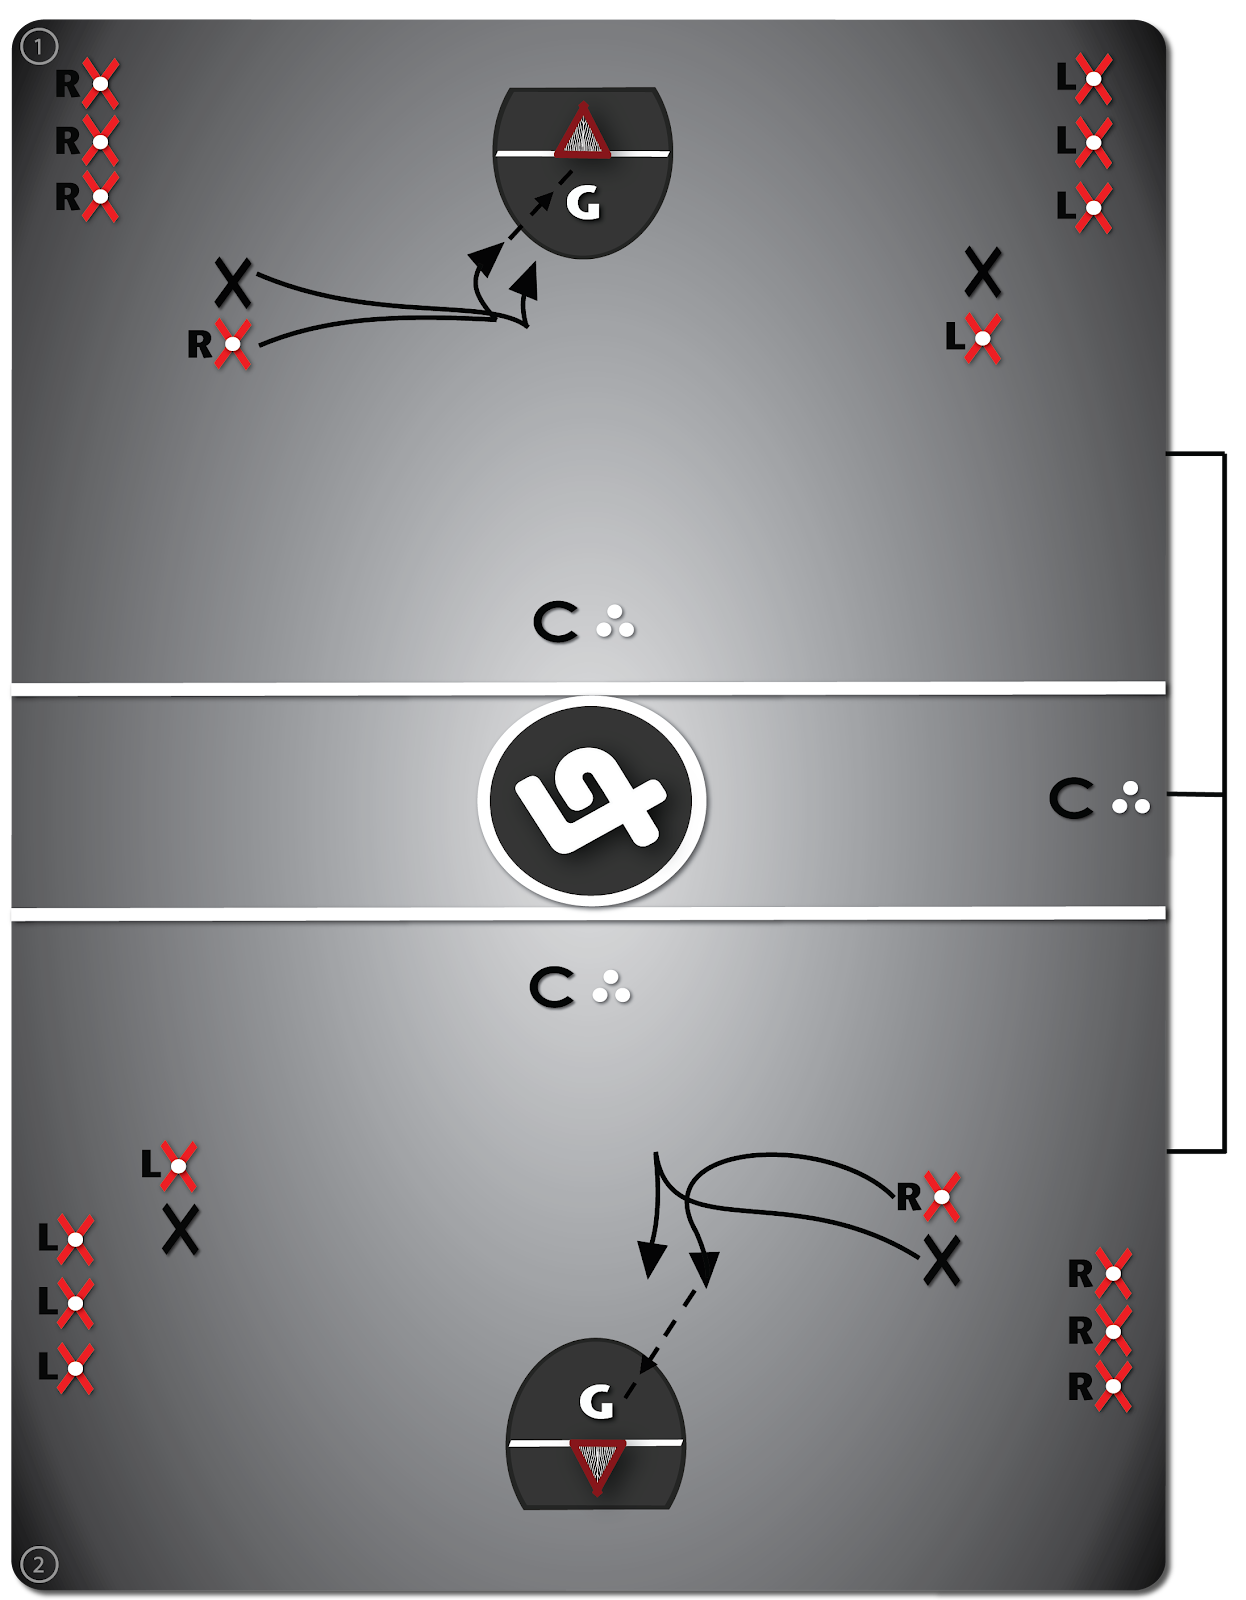
Inevitably a defender will get beaten top-side and needs to know how to “recover” while at the crease and shooter positions, which is the focus of our second staple drill
Drill #3: "4 Corner Checking"
This drill incorporates all of the concepts of the previous drills in terms of playing "top-side," except it allows for more reps for more players, in a shorter amount of time.
Variation #1 sees the player play offense, then defense, at either the crease or shooter position on their proper-floor-side, switching lines after playing defense. Variation #2 is more consolitory in nature, meaning that after players have shown good "top-side" technique while relatively fresh, players are now forced to play defense against all 4 corners consecutively, which adds an element of fatigue to the equation.
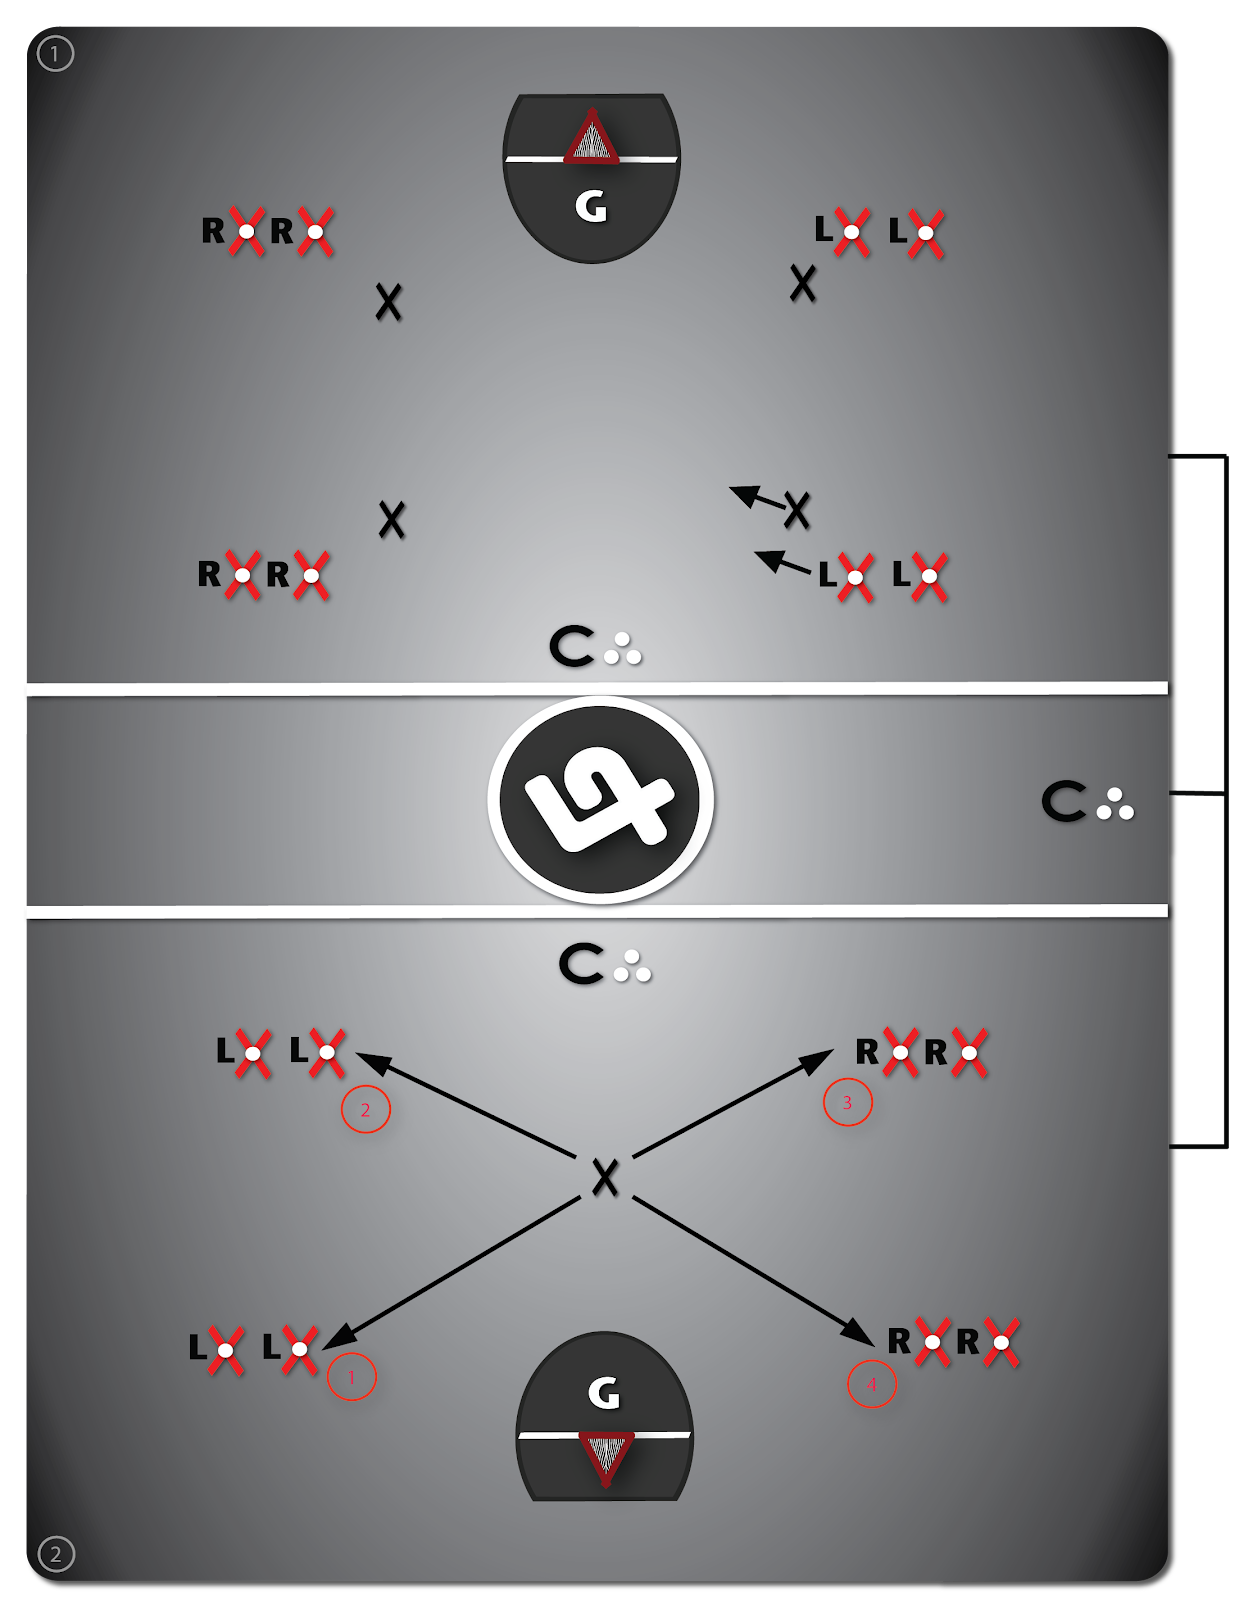
Final 1-on-1 skill/drill consolidation can happen by checking an individual corner at a time and then rotating, or for more advanced players, checking all 4 corners consecutively
CONCLUDING THOUGHTS:
This sequence of drills is a great foundation for better defense at the beginner level. It is limited in that it has no elements of off-ball defense and team defense as a whole. Likewise, for a group of beginners, this might be the extent of the defense that gets taught (perhaps over several practices instead of all in one) over the course of the season. The other fundamentals of loose balls, ball protection, basic transition, passing, catching, shooting, and basic offense, are equally as worthy.

The next step is playing good team defense and helping each other out where possible...
Beginner Lacrosse Drills: Don’t Start With Passing & Catching!
The fundamentals of lacrosse include: basic defense, scooping (loose balls), cradling/ball protection, basic transition, passing, catching, shooting & basic offense (appearing hypothetically in that order). You play good defense, knock the ball loose, pick it up, protect it and/or cradle it forward, pass the ball to any open players ahead of you, catch the pass and then shoot it if you are undefended and in the middle of the defense; otherwise creating a shot with basic offensive maneuvers. This is the order of operations in lacrosse, and this is the order we introduced the fundamentals in our first 3 (free) one-hour practices for beginners, requiring only helmets & gloves, nets & balls.
In this blog, we are actually going to start where, in our opinion, most coaches go wrong in teaching first-timers, and that’s starting with passing and catching! Usually, we would start with defense, loose balls, then cradling/ball protection, before getting to passing and catching, as this is the order that the skills appear in a hypothetical game. Below, you will find a great drill for warming up the catching skills of beginners, eventually getting into stationary passing & catching progressions and later dynamic passing-on-the-run.

Drill #1: Catching On-The-Run

This first warm-up drill is a great starting point for continuing to build on the dynamic aspects of catching. In its most simplest form, our Laxlife Fundamentals Practice #1 broke Catching down to a coach or teammate underhand passing the ball with their hand into the player’s stick (above their shoulder in “the box”); where required. In this drill we are essentially doing the same thing except the player is now in motion, yet the ball remains relatively stable.
The coaches are at centre-floor (by the side-boards) with a pile of balls and as a player approaches, the coach throws the ball straight up into the air for the player to then run underneath and catch (ideally over their shoulder). Players then go in for a breakaway shot on the goalie or open net (from mid-range - perhaps put a pylon down for a marker), being sure to get to their proper side where necessary. In that respect, coaches should also switch which corner the line they are throwing to is coming from, in that way players will have the chance to catch the ball with their stick towards the boards, and also with their stick towards the middle.
This drill is also one of the drills we use to track the dynamic catching skills of players in our Fundamental Skills Tracking Sheet.
Drill #2: Partner Passing

Here it is assumed that players have already gone through a series of drills for the fundamentals of passing and catching, and have likely already done the partner passing drills to follow. However, the difference is that this time coaches will be adamant that passers use basic footwork (performing changes of direction while running forward, back-pedaling and/or side-shuffling), before passing.
People can typically only remember 2-3 pieces of information maximum in any given scenario, so the first time through partner passing, as in our Laxlife Fundamentals Practice #2, we had players focus on basic footwork for instance, stepping with the opposite-side leg from the hand with which they throw. That was combined with remembering to reach their arms when they prepare to pass, and transferring their weight from their back foot to their front foot. We are now asking players to pass while slightly off balance, maintaining the triple threat position (“shopping") and focusing more on their follow through. This is a further example of the horizontal integration required to efficiently build up a stabilized fundamental skill.
The drill variations remain the same as in the basic fundamentals practices, beginning with stationary catching (regular and later “facing away”), except this time players progress to both a dynamic passer and a dynamic receiver running towards each other (Variation #3C).
Drill #3: "Staggered" Partner Passing On-The Run

The previous drill increased the movement of the passer and the receiver, yet still within a confined space. In this drill players are now asked to pass and catch on-the-run, while running in the open floor, with players now getting the opportunity to explore the concept of “lead” passing; throwing the ball to where the player is headed, not where they currently are.
Starting with two parallel lines at the top of one of the creases, and players on their wrong floor-side (which may seem counterintuitive at first), just the receiver runs forward while the passer uses basic footwork to deliver the pass. The passer then runs forward and becomes the receiver, while the original receiver becomes the passer. Players must make lead passes to each other while running from one end to the other; finishing with a quality shot on net. They may also need to “soften up” their pass when they are this close together.
Start slow, around 50% of maximum speed and move players progressively further apart. After a few reps this way (which is generally easier), players now switch to starting on their proper floor side, which is a bit more challenging of a pass to gauge, as the receiver’s stick is now trailing behind their body as they run forward. The passer as well, needs to consciously reach their stick back, and open their hips to make a successful pass. No side-shuffling is allowed; players should always be running straight forward, side-by-side, separated by gradually increased distances.
Don’t Do It!
It may be hypocritical that we say not to start with passing and catching when teaching the fundamentals to first time lacrosse players, and then go and do our first fundamentals blog on passing and catching progressions. The truth is, there are always exceptions, and this case, practical considerations (Covid-19).
Originally we had intended to release our blog on “Individual Defensive Skill Progressions” first, but we had to stay flexible and adaptable given the situation, which is a big part of coaching (and life). Players as well, perhaps don’t always have all of the tools available to their peers; it’s important to be versatile! Use your imagination. Stay safe, and continue to spread the medicine game to those in need!
Beginner Lacrosse Drills: Warm-Up Drills & Shuttles
A Dynamic Warm-Up is a fundamental element of any physical activity, often beginning with a series of basic calisthenics (body weight activities) used to get the blood moving (break a sweat) and joints lubricated. In a training environment, this could entail a 20m: run forward/backpedal backward (twice), side shuffle with arm swings (both directions twice), tracking forward/backward (twice), carioca (both directions twice). For kids, it could be as simple as a modified multi-sport game. During practices and games, a general warm-up could also just be a basic drill done at 75% of max intensity.

In a sport specific context, any drill that keeps the players' feet and sticks moving continuously for 3-5 minutes, or until players “break a sweat,” is a great prelude to the dynamic stretches (or foam rolling) that should generally follow. Below are some of the common drills used not only as a tool for warming-up, but also for coaches who are new to a group and trying to assess the overall level of stick skills.
Drill #1: "Basic Line Shuttles”
The next most tried, tested and true method for warming up the sticks of beginners, also providing lots of reps in a short amount of time, is doing “shuttles.”
The most basic shuttle is a loose ball line shuttle. With two lines starting across from each other (approximately 15 metres apart), the first player at the front of the line “attacks” a stationary loose ball in the middle. This player “traps & scoops” the ball, then puts it back on the ground for the first player in the opposite line from them and runs to the back of that opposite line. There is a certain element of cardio/fatigue with the extra running involved and that is where shuttles are useful as a general warm-up.
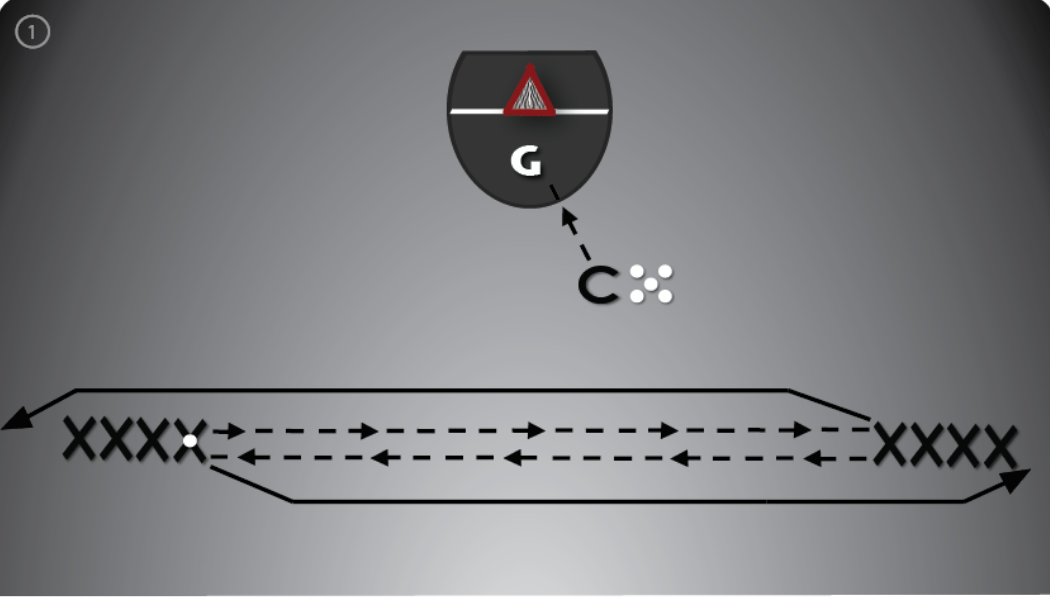
The next progression is very similar except this time the first player in one line rolls a ball to the first player in the opposite line and then runs to the back of that line. The player at the front of the opposite line “attacks” the loose ball, and continues the cycle (see diagram above). There are many variations of a line shuttle and it can be used for loose balls, passing, or both. If more than one shuttle grouping is being used because of lots of players, competition between the different shuttle groups in terms of how many successful catches they make in a row, for example, can be a great motivator and lots of fun!
Drill #2: Board Shuttles
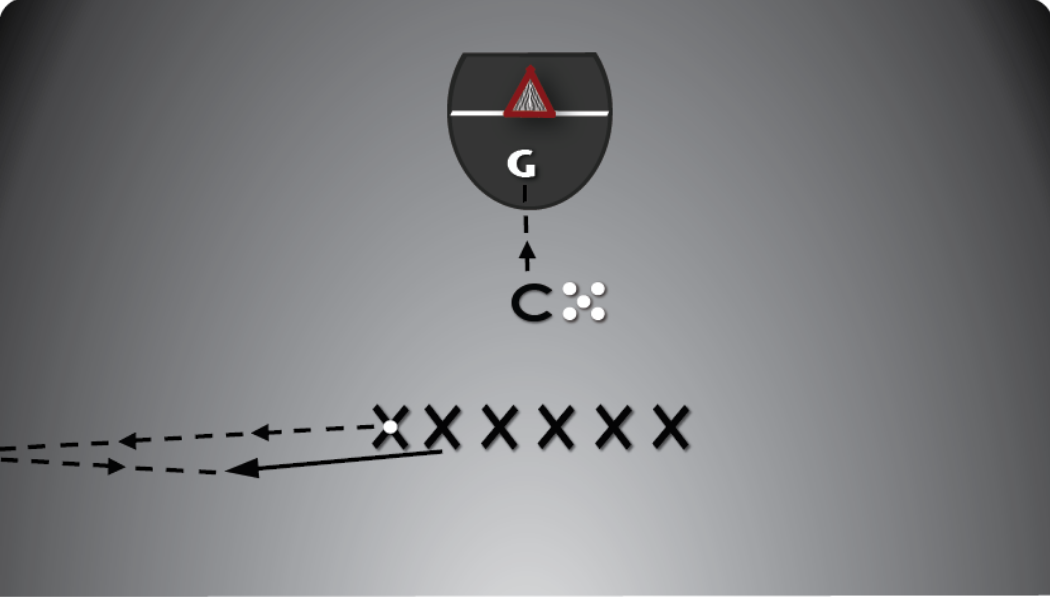
Board shuttles bring a trickier ball bounce to the equation, whereas the last drill had a stationary ball placement which progressed to rolling the ball along the ground. Now, players are asked to pass the ball against the boards, with the next player in line corralling the rebound and doing the same for the player behind them. Players will ultimately see a much more diverse array of loose balls, with the most basic teaching point being “get your body in front of it.” That way, at least if the player misses the ball it could hit their body, which often gives the player a second opportunity at it. Coaches should always have at least 3 balls on hand, that way if a player misses one, they can toss another ball in quickly, so as to not interrupt the flow of the drill.
Drill #3: "3-Player Shuttles”
In three player shuttles, players are arranged into groups of 3, in a straight line, with the outside players approximately 15-20 metres apart and a third player in the middle. The player in the middle switches every 30 seconds at the sound of the coaches whistle and each player gets two turns in the middle with each variation of the shuttle.
The most basic variation is the “reaction pass” (Variation #1) where both outside players have balls and the player in the middle is facing one of the two outside players. The player in the middle switches back and forth with who they are looking at, catching a pass and then passing it back to the same person, before eventually turning and receiving another pass.

In Variation #2, the player in the middle starts closer to one outside player than another, facing the player they are furthest away from. The player in the middle passes the ball to this person and continues running forward until they receive the pass back. As they receive the pass back they either turn into the ball (Variation #2A), or turn away from the ball (Variation #2B). As a reference point, "turning into the ball" would see the player turn in toward the midline of their body with their top-hand shoulder, whereas "turning away from the ball" would be turning away from the players' mid-line. The player in the middle continues back and forth, switching patterns each time through the drill.
Drill #4: "Traffic Shuttles”
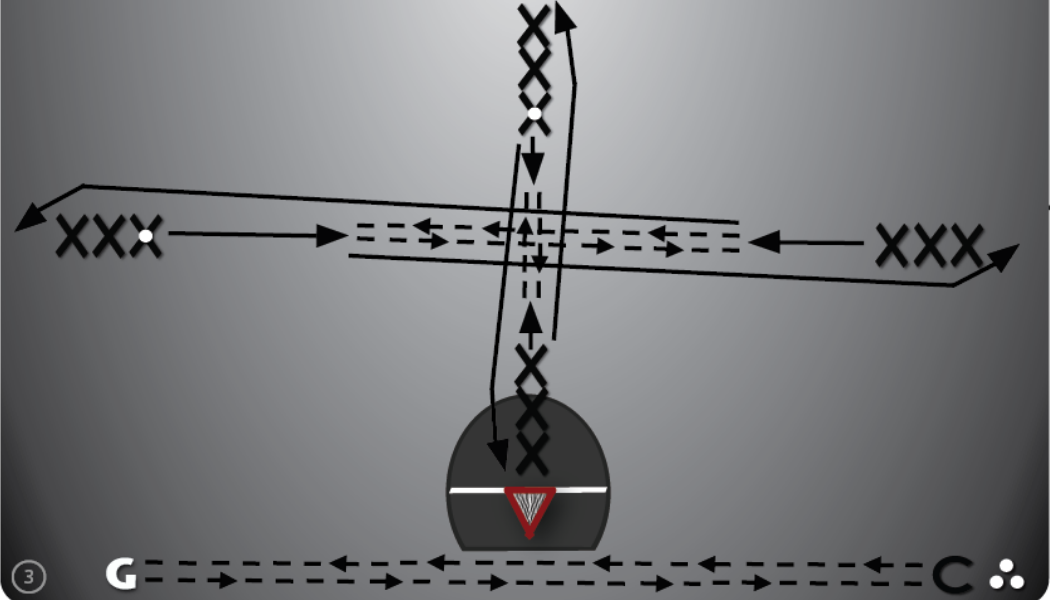
The “Traffic Shuttle” fundamentally requires more players than drills #1 to #3, which can be done with as little as 2 and 4 players, respectively. This drill would require at least 8 players. Spatial awareness is a big part of being able to successfully corral loose balls, pass and catch in a game situation, and this drill is a great progression for players as they now have to execute loose ball, passing and catching skills ("stickwork") in a more dynamic environment. The most important lesson here is for players to keep their “head on a swivel” as much as possible, before and after receiving the ball. This drill can also be made into a relay race, where coaches track successful passes or cycles through the shuttle without a dropped ball. The team with the most at the end is the winner.
CONCLUDING THOUGHTS:
The bottom line is that doing basic lacrosse drills that get the blood going is a lot more fun for kids than just running laps, cone drills, or whatever you may be doing as a general warm-up for your practice (likely for too long and/or with not enough continuous cardio). The less players in each shuttle, the more cardio effect to be had, and the higher likelihood of players dropping balls in the drill. If you are coaching young beginners, you may never even get past loose ball shuttles, but at least you can still progress with some of the different shuttle variations listed above, with further variations available to subscribers.
For more intermediate and advanced shuttle variations, visit the warm-up section of the laxlife.ca website.
Laxlife Blog #1: Fundamental Practice Plans
Are you frustrated with the lack of coherent lacrosse information available on the internet? Don't waste your time practicing with disconnected practice plans that lack purpose and progression (The WHY + The HOW). Use the Laxlife tried, tested and true, practice plans which are evidence-based, with skills and drills horizontally integrated (evenly balanced) across several practices, to ensure that skills are developed efficiently and effectively
The fundamentals of lacrosse include: basic defense, scooping (loose balls), cradling/ball protection, basic transition, passing, catching, shooting & basic offense (appearing hypothetically in that order). You play good defense, knock the ball loose, pick it up, protect it and/or cradle it forward, pass the ball to any open players ahead of you, catch the pass and then shoot it if you are undefended and in the middle of the defense; otherwise creating a shot with basic offensive maneuvers.
Our first three Laxlife practices horizontally integrate the above mentioned fundamentals, culminating in a small-sided game of 3 vs. 3 at the end of the 3rd practice.

Fundamental Lacrosse Practices (#1 to #3)
Within our "Laxlife Practice Plans" we have developmentally appropriate plans for all ages and all skill levels. Initial fundamentally-based practices provide team administrators the opportunity to identify the physical development (chronological age vs. biological age) and caliber of players, some of whom may be better suited in an older or younger age group and others who may be good enough to potentially play “rep” league lacrosse instead of "house league." Our FREE basic/beginner level practices (Practices #1 to #3) provide the perfect opportunity for the formative (general) observations and assessments of players, which are helpful for creating parity within a house league setting, and also for establishing goals and next steps (direction) for a team once it is made. Our Fundamental Skills Assessment is an example of a helpful tool in this regard and can be integrated horizontally through a series of practices (as it is in Practices #1 to #3 - discussed below), or otherwise in a player assessment type atmosphere, which takes roughly 1.5 hours of practice time to complete depending on the numbers.
The Basics (Practice #1):
The warm-up in our 1st practice establishes its remedial tone, with players in helmets & gloves and the first activity for the kids being to run a few laps around the perimeter of the rink (or a designated perimeter) with only sticks in hand, no balls. The primary instruction for players is to keep two hands on the stick, which is a very important fundamental concept overall. Coaches may also gauge and take note of the running technique of individual players, something which can be developed in future practices. This initial warm-up offers players a feel for the stick in determining which side of their body it feels most comfortable on (learning by discovery), while also assisting in getting the players’ blood flowing (warm).
Dynamic stretches would typically follow this general warm-up, but in the interest of skill development in this 1st practice we feel it is best that they be forgone based on time appropriation. Following the general warm-up, we recommend dividing the kids into two teams (equal lefties & righties) where they will work as a group for the first three practices (depending on numbers). Next, announce that at the end of the 3rd practice there will be a 3 vs. 3 game between the two teams, which helps keep players motivated and striving to improve their fundamentals, under the guise of “getting prepared for the big game.” This is a great opportunity for the kids to develop camaraderie, and has its benefits for organizational purposes as well.
Being that lacrosse participants must have some degree of skill in passing and catching before commencing game play, this first practice essentially introduces the four most basic skills required to play a game of lacrosse: basic defensive footwork, loose balls, cradling/ball protection; then passing/catching. We are essentially teaching these skills in the hypothetical order that they appear in a game: moving without the ball, picking the ball up off of the floor, protecting the ball once you’ve got it, and then either passing to a teammate or shooting. Certain skills take precedence over others and are taught in a specific order to ensure success in present and future drills/practices.

Two last important points to make about this first practice is that after each fundamental is taught there is a fun culminating activity (game) which involved that fundamental skill, also, that no goalie is recommended for this practice, as well as the next two practices described below. The reason being, that we feel all players should be learning the fundamentals and wouldn't want to pigeon-hole someone as a goalie too early (especially young kids). In fact, once we get to shooting (Practice #2) and scrimmaging (Practice #3), players eight years old and younger will actually be shooting on a 3x3 net, with no goalie.
The Basics - Progression (Practice #2):
The 2nd Practice (as well as the first practice) has the option of an outdoor venue (based on equipment availability) and players/parents are also invited to attend a demonstration (20 minutes prior to practice) on the basics of stick stringing (stick cutting occurred prior to Practice #1). The 2nd practice naturally progresses forward in several different aspects, while incorporating many of the basic concepts from the previous practice. Starting with a quick re-hash on the skills learned in the previous practice, one of the first obvious progressions is in the general warm-up, as players are now encouraged to practice their cradling as they run around the box; also in the next drill as they "follow the stick" (Athletic Position - Variation #3). This gives the players a chance to progress their footwork from an offensive perspective, as opposed to a defensive perspective (no ball) in the previous practice.

The first warm-up drill (Partner Passing – Variation #2 to #4) provides players the opportunity to further practice two of the most important skills taught in the 1st practice: passing & catching. These drill progressions are an example of moving from simple to complex and/or static to dynamic in orientation, which was also a strategy employed in the 1st practice with loose balls and cradling. Players are encouraged to gradually move further and further away as they pass; later passing or catching using a short run; and lastly catching passes while facing away from their partner. Once the players are warmed up, coaches should then take the time to introduce some basic dynamic stretches (stationary routine) and stress the importance of doing them as a team (in a relatively straight line) for cohesiveness, which is intimidating to opposing teams and also fosters unity.
The main activity of this practice then focuses on one of the main fundamental skills that was not touched on in the 1st practice, which is shooting. Teaching the mechanics of shooting is usually best accomplished starting with a set-shot, which occurs when the player has "time and space". After a brief demonstration (check out our Skills Analysis pages for more technique tips), players are encouraged to head to the boards/wall and to pick a target, getting a bunch of early reps with set-shots (Wall Ball - Variation #5).
Continuing with the theme of players getting lots of reps, next players move to the net, with all players shooting at the net at once in the (Horseshoe Drill - Variation #1), and coaches keeping track of how many balls hit the net each time (you can't score if you don't hit the net!). Next, players then get the opportunity to practice shooting-on-the-run within the same drill formation (Variation #4), which happens much more frequently than set-shooting, utilizing the same mechanics taught with passing, and very similar mechanics to set-shooting.
Finishing the practice continuing with the theme of "fun,” two games are used as culminating activities: Cradling Relay Race - Variation #1 and Shooting-On-The-Run Relay Race - Variation 1 (See Diagram Below), which teaches the player how cradling can also being an important part of being able to effectively shoot-on-the-run. If you happen to be short on time, the shooting-on-the-run relay should take precedence over cradling relay.

To conclude, at least 5 minutes at the end of practice should be devoted to intermittent sprints in the "Rabbit Run" - Variation #1, which is the type of cardio players should be getting used to as they prepare to play an actual game of lacrosse in the following practice. The cool down introduces “static stretching” and is completely player-centred, giving players a chance to demonstrate what they know, and again learn by discovery. It may be noted as well that with the exception of monitoring successful catches while passing with a partner and team relay races, there has been very little competitive activity in these initial practice environments.
The Basics - Culmination (Practice #3):
Practice Plan #3 and all subsequent practice plans may also be held at an outdoor box (if available) in order to save costs, although usually it is best to practice in the same environment that players will typically be playing in. Having said that, if players have any aspirations for playing field lacrosse, accounting for the sun, wind and sometimes rain, while playing outdoors could also prove to have beneficial effects for some.
Up until now, we have also yet to discuss what we say to the group (also when), and why we say what we do. In our first practice we spoke about the history of lacrosse among First Nations people and an Ancient Haudenosaunee Legend where the birds played against the animals; also how there is a place for everyone in lacrosse! In the second practice we discussed "hard work" and perseverance, also its importance in lacrosse and life, and in the third practice we like to talk about "fun," which is the number one reason why kids play sports. All three of these discussions commenced either before or after practice, but coaches still need to be unpredictable and spontaneous in their practice planning and reinforcement strategies in order to keep the attention of kids/young adults (using a variety of teaching styles). Therefore, a story about the virtues of the game may be appropriate at any point during a practice, not just the beginning or the end.
The beginning drills in Practice #3 focus on rehashing previously taught skills in a more dynamic fashion, namely loose balls and catching, which are the most important aspects of the modified 3x3 lacrosse game at the end of practice. The rest of the third practice focuses on basic defensive (“Open Floor Checking” - Variation #1 & #2), basic transition (outlet passes) and basic offensive skills (hitch steps, face dodges, roll dodges) as they relate to Game Play. The game itself is should be played from side-boards to side-boards with the 3x3 nets (or bottom-up nets) flush against the side-boards (with a 8-foot creases taped onto the floor - measured from the centre of the goal-line). Play starts with a loose ball from the coach or pulling the ball out of the net after a goal. There are one minute shift intervals, with coaches mixing up the players as best as possible using a balance of lefty's/righty's and keeping track of the overall score only for 10+ year olds. Ideally there would be four nets on site, ensuring that a game could be played in both ends (maximum participation) need be, with everyone else standing at centre-floor.
Team #1 ends up playing against Team #2 (cumulative score), in what is otherwise known as a “small-sided game,” with players wearing helmets and gloves or possibly even no equipment (see "soft lacrosse" rules below). This intermittent activity is excellent for players’ cardio and also gives them a chance to apply the skills they have learned thus far (getting lots of touches of the ball), while also having some fun. Coaches should suggest that players do static stretches at the end of practice, taking note of who actually does them, which primes them for future discussions.

Laxlife Rules for “Soft” Lacrosse:
1. THE BALL USED IN THIS PROGRAM IS A HIGH DENSITY FOAM (SOFT) BALL
2. THERE IS NO CONTACT BETWEEN STICK AND BODY (PENALTY SHOT)
3. THERE IS NO CONTACT STICK ON STICK “STICK CHECKING” (PENALTY SHOT)
4. THERE IS NO BODY CONTACT “BODY CHECKING” (PENALTY SHOT)
5. WHOEVER PUTS THE BACK OF THEIR STICK ON BALL RETAINS POSSESSION
6. THERE IS A SAFE CIRCLE OF 1 METRE AROUND THE PLAYER WITH THE BALL IN THEIR STICK
7. THIS PROGRAM DOES NOT UTILIZE GOALIES
8. THERE IS A 8-FOOT CREASE SURROUNDING THE GOAL (TRASH CAN or UPSIDE-DOWN NET)
9. SPORT SAFETY GOGGLES ARE RECOMMENDED ALTHOUGH NOT REQUIRED
10. ENSURE THAT BALLS NOT IN USE ARE KEPT IN A SAFE AREA AWAY FROM THE FIELD OF PLAY TO AVOID PLAYERS STEPPING ON A BALL
*CHANGES IF PLAYERS HAVE HELMETS & GLOVES: RULE #1 (RUBBER BALL USED), RULE #3 (STICK CHECKING PERMITTED), RULE #4 (“BUMPING HIPS” PERMITTED), RULE #5, #6, #9 (EXEMPT)*
CONCLUDING THOUGHTS:

Younger players will often benefit from more landmarks (pylons) on the floor
Progressing through the Laxlife Practice Plans in the order they appear is perhaps not as critical as the actual skill progressions within each practice. At times, going back and redoing a previous practice or specific drills from a previous practice that players struggled with, is more important than following the practice plans verbatim (it will not be a completely linear process).
The beauty of our Laxlife Practice Plan Creator is that it allows you to create your own practices, otherwise take a Laxlife Plan and remodel it to suit your team's needs. Coaches can get as creative as they’d like with all of the flexibility and variations within the Laxlife Drillbook. They can even create their own drills with our Laxlife Drill Creator. Drills don’t necessarily need to be run for the exact amount of time suggested; coaches should be looking to create practices that suit the needs of their team. At times, certain drills that are not well executed will need more practice. Coaches need to be able to make decisions while thinking on their feet (ad-libbing), perhaps even cutting off a drill mid-way through or skipping a drill entirely if a certain aspect of a skill needs further attention. It is up to the coach to feel out which drills are running smoothly and when drills are ready to be changed.
It’s natural that some players will be more gifted in lacrosse than others, a bell-curve for the most part, but the team will only ever be as good as its weakest link. Our Drillbook & Playbook will hopefully give all lacrosse enthusiasts alike the opportunity to experience success in the game of lacrosse. Our website is an honest attempt to break a complex game down into its simplest form.
1st Post test
Lorem ipsum dolor sit amet, consectetur adipiscing elit, sed do eiusmod tempor incididunt ut labore et dolore magna aliqua. Ut enim ad minim veniam, quis nostrud exercitation ullamco laboris nisi ut aliquip ex ea commodo consequat. Duis aute irure dolor in reprehenderit in voluptate velit esse cillum dolore eu fugiat nulla pariatur. Excepteur sint occaecat cupidatat non proident, sunt in culpa qui officia deserunt mollit anim id est laborum.Lorem ipsum dolor sit amet, consectetur adipiscing elit, sed do eiusmod tempor incididunt ut labore et dolore magna aliqua. Ut enim ad minim veniam, quis nostrud exercitation ullamco laboris nisi ut aliquip ex ea commodo consequat. Duis aute irure dolor in reprehenderit in voluptate velit esse cillum dolore eu fugiat nulla pariatur. Excepteur sint occaecat cupidatat non proident, sunt in culpa qui officia deserunt mollit anim id est laborum.Lorem ipsum dolor sit amet, consectetur adipiscing elit, sed do eiusmod tempor incididunt ut labore et dolore magna aliqua. Ut enim ad minim veniam, quis nostrud exercitation ullamco laboris nisi ut aliquip ex ea commodo consequat. Duis aute irure dolor in reprehenderit in voluptate velit esse cillum dolore eu fugiat nulla pariatur. Excepteur sint occaecat cupidatat non proident, sunt in culpa qui officia deserunt mollit anim id est laborum.Lorem ipsum dolor sit amet, consectetur adipiscing elit, sed do eiusmod tempor incididunt ut labore et dolore magna aliqua. Ut enim ad minim veniam, quis nostrud exercitation ullamco laboris nisi ut aliquip ex ea commodo consequat. Duis aute irure dolor in reprehenderit in voluptate velit esse cillum dolore eu fugiat nulla pariatur. Excepteur sint occaecat cupidatat non proident, sunt in culpa qui officia deserunt mollit anim id est laborum.
